Cloud Quick Start: Difference between revisions
| Line 24: | Line 24: | ||
##Save the <key name>.pem on your disk. | ##Save the <key name>.pem on your disk. | ||
On UNIX hosts, you will need to <code>chmod 400 <key name>.pem</code> in order to connect later on. This needs to be done on your machine, not the VM. In windows to use the key with PuTTY or MobaXterm you need to convert it to a format they understand steps to do this are given on the [[Generating ssh keys in Windows#Converting an OpenStack Key]] page. | On UNIX hosts, you will need to <code>chmod 400 <key name>.pem</code> in order to connect later on. This needs to be done on your machine, not the VM. In windows to use the key downloaded from OpenStack with PuTTY or MobaXterm you need to convert it to a format they understand steps to do this are given on the [[Generating ssh keys in Windows#Converting an OpenStack Key]] page. | ||
==Launching a VM== | ==Launching a VM== | ||
Revision as of 13:50, 4 March 2016
Launching your first instance (VM)
Login to the East or West Cloud
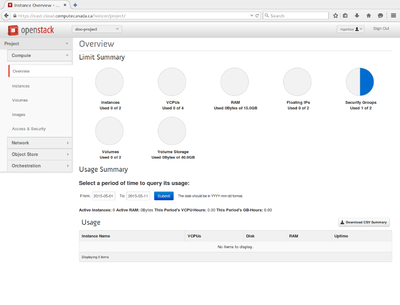
Go to https://east.cloud.computecanada.ca or https://west.cloud.computecanada.ca and enter your WestGrid credentials. After you have logged in, you are presented with the dashboard. From here you can see an overview of the resources you are using.
SSH Key Pair
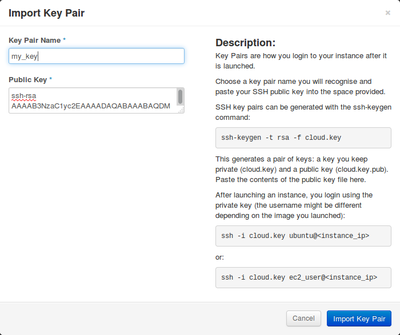
When you start a virtual machine (or "instance") there is no password for admin or root account on the VM, and no one can log in to it using a password. We do this for security reasons: You would not want a hacker to be able to access the brand new VM you just started using some default password. Therefore OpenStack will create your VM with one SSH public key installed, and you can only log in to it with that SSH key pair. You can either import an existing SSH key pair through OpenStack, or you can create a new pair. In order to manage your key pair, click on “Access & Security” from the left menu, then on the “Key Pairs” tab.
Importing an Existing Key Pair
- Click

- Then,
- Give a name to your key.
- Paste your public key.
- Click on the blue Import Key Pair button.
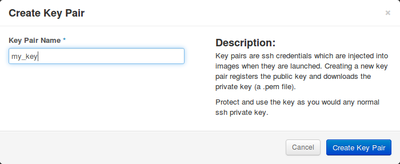
Creating a New Key Pair
- Click

- Then,
- Give your key a name.
- Click on the blue Create Key Pair button.
- Save the <key name>.pem on your disk.
On UNIX hosts, you will need to chmod 400 <key name>.pem in order to connect later on. This needs to be done on your machine, not the VM. In windows to use the key downloaded from OpenStack with PuTTY or MobaXterm you need to convert it to a format they understand steps to do this are given on the Generating ssh keys in Windows#Converting an OpenStack Key page.
Launching a VM
To launch an instance, click on the Instances menu on the left, then click ![]()
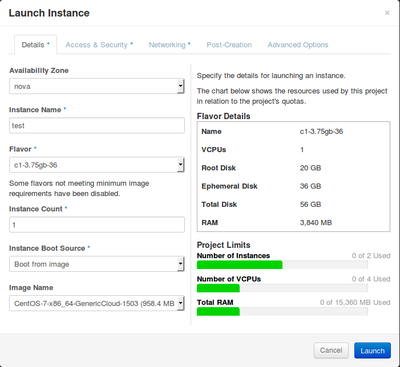
You are now presented with a form to define your instance. For this walk-through, fill in the arbitrary values described below.
- Details tab
- Availability Zone: There is only one zone. Leave it unchanged.
- Instance name:
test
Make up a name for your instance. - Flavor:
c1-3.75gb-36
The flavor name defines the specifications of the VM. This particular flavor has one virtual CPU, 3.75 GB of RAM (memory) and an ephemeral disk of 36GB. - Instance Count:
1
Instance Boot Source: Boot from image - Image Name:
CentOS-7-x86-64-GenericCloud-1503 - Project Limits: The green bars reflect the fraction of your available resources that will be consumed by the VM you are about to launch.
- Access & Security tab
- Key Pair: Select your SSH key pair. If you have only one, it will be selected by default.
- Security Groups: Leave
defaultselected here.
- Networking tab
You do not need to change this now. Networking will be discussed below after you have launched in instance. - Post-Creation Tab
No need to change this now. This is where you can paste a cloud-init script which can do things like install and configure software, add users, and add additional SSH keys, in an automated step after the VM is created. See cloudinit for more details. - Advanced Options tab
Leave Disk Partition on "Automatic" for now.
Once you have reviewed all the tabs and defined your instance, click on the blue Launch button and your instance will be created. The Instances list will appear, and the Status field will change, reflecting the different tasks that have to happen until it is running. It may take a few minutes for your instance to start, depending on a variety of factors.
Note: When creating a persistent service, we recommend that you boot your instance from a volume. See Persistent Services In The Cloud.
Network
Private IP
On the Instance list, you will see the IP addresses to which your instance is linked. By default a network on 192.168.X.0 is created for your tenant. You can see the private IP your instance has on the Instance list screen. You can use this IP to communicate with other instances you have started on the same cloud.
Public IP (Assign a public IP)
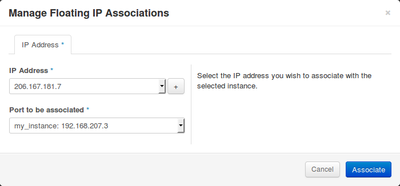
To assign a public IP, you need to select “Associate Floating IP” from the More button of the Actions column of the Instances list. If this is your first time through this Quick Start Guide, your tenant hasn't been assigned any external IP addresses yet. You need to click on the “+” sign to bring up the "Allocate Floating IP" dialogue box. There is only one pool of public addresses, so the correct Pool will already be selected. You simply click on the blue Allocate IP button. You will be returned to the "Manage Floating IP Associations" screen, the IP Address field should be populated, and the port to which it should be NATted should already be selected. Simply click on the blue Associate button.
Firewall, Add Rules to Allow SSH
In order to be able to connect to your instance via SSH, you will need to allow SSH to get through.
Go to “Access & Security”, in the “Security Groups” tab, then on the default row click ![]()
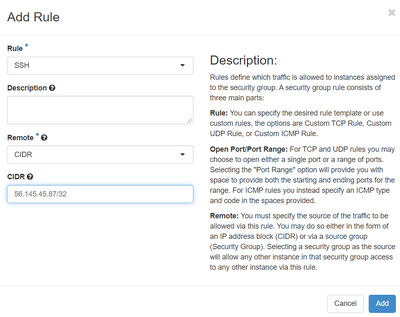
For SSH, there are already predefined rules. Simply select SSH in the Rules drop down menu, then under Remote, keep CIDR.
If you know which address you are connecting from, type it in the CIDR text field; otherwise keep 0.0.0.0/0. This will allow the whole world to connect to your server via SSH.
Finally, click the blue Add button.
Connecting To Your Instance With SSH.
If you created a key pair on the first step, you will need to know where it is.
If connecting from a Linux machine:
[name@server ~]$ ssh -i /path/where/your/key/is/my_key.key username@<public IP of your server>
Most common Linux distributions have standardized on the name of the distro as the username. To connect to the provided CentOS images, you would use:
[name@server ~]$ ssh -i /path/where/your/key/is/my_key.key centos@<public IP of your server>
Ubuntu instances have the username “ubuntu”; Debian ones are “debian”. By default the preconfigured cloud username will have full sudo privileges. The root account is normally disabled.
You are now connected to your instance.
If connecting from a windows machine
see Connecting with PuTTY or Connecting with MobaXTerm
Where To Go From Here
- Cloud-init: https://cloudinit.readthedocs.org/en/latest/
- Openstack upstream documentation: http://docs.openstack.org/icehouse/
- CLI control: http://docs.openstack.org/developer/python-openstackclient/
- WestGrid documentation: https://www.westgrid.ca/support/quickstart/CC-Cloud
