JupyterLab: Difference between revisions
(Typos) |
(More about the copy-and-paste) |
||
| Line 63: | Line 63: | ||
** Allows running compute tasks | ** Allows running compute tasks | ||
* The terminal allows copy-and-paste operations of text: | * The terminal allows copy-and-paste operations of text: | ||
** Copy operation: select text, then press Ctrl+C | ** Copy operation: select the text, then press Ctrl+C | ||
*** Note: usually, Ctrl+C is used to send a SIGINT signal to a running process, or to cancel the current command. To get this behaviour in JupyterLab's terminal, click on the terminal to deselect any text before pressing Ctrl+C | |||
** Paste operation: press Ctrl+V | ** Paste operation: press Ctrl+V | ||
=== Python (Notebook) === | === Python (Notebook) === | ||
Revision as of 20:08, 8 January 2021
This is not a complete article: This is a draft, a work in progress that is intended to be published into an article, which may or may not be ready for inclusion in the main wiki. It should not necessarily be considered factual or authoritative.
Introduction
JupyterLab is now the recommended general-purpose user interface to use on a JupyterHub. From a JupyterLab server, you can manage your remote files and folders, and you can launch Jupyter applications like a Terminal, (Python 3) Notebooks, RStudio and a Linux Desktop.
The section JupyterHub#Compute_Canada_initiatives contains the list of available Jupyter Hubs at Compute Canada. Compute Canada credentials are used for authentication.
Launching a JupyterLab server as a job
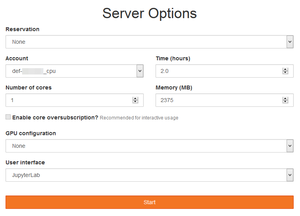
On Béluga and Hélios, once the authentication is done on JupyterHub, your Web browser is redirected to either a previously launched Jupyter server or a form that allows you to configure and submit a new interactive session on the cluster. In any case, the JupyterLab server is running on dedicated compute resources.
In the Server Options form, you can:
- Select the compute account to be used (any
def-*,rrg-*,rpp-*orctb-*account you have access to) - Set the amount of hours required for the session
- Set the number of CPU cores that will be reserved on a single node
- Set the amount of memory for the entire session
- (Optional on Béluga) Select one or two GPUs
- Select a User Interface - this is where JupyterLab should be selected
The JupyterLab Interface
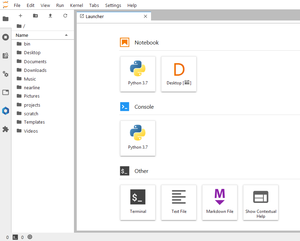
When JupyterLab is ready to be used, the interface has multiple panels.
Menu bar on top
- In the File menu:
- Hub Control Panel: if you want to stop the JupyterLab server and the corresponding job on the cluster
- Log Out: if you want to leave the Web interface, but keep the server up and running
- Most other menu items are related to Notebooks and Jupyter applications
Tool selector on left
- File Browser (folder icon):
- This is where you can browse in your home, project and scratch spaces
- It is also possible to upload files
- Running Terminals and Kernels:
- To stop kernel sessions and terminal sessions
- Commands
- Property Inspector
- Open Tabs:
- To navigate between application tabs
- To close application tabs - the corresponding kernels remain active
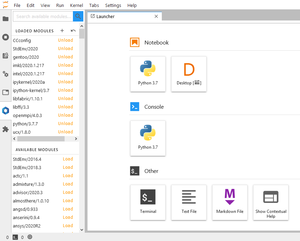
- Softwares (blue cubic icon):
- Compute Canada modules can be loaded and unloaded in the JupyterLab session
- The search box can search for available modules and give the result in the Available Modules panel. Note: some modules are hidden until their dependency is loaded - we recommend that you first look for a specific module with
module spider module_namefrom a Terminal. - The next sub-panel is the list of Loaded Modules in the whole JupyterLab session. Note: while
pythonandipython-kernelmodules are loaded by default, additional modules must be loaded before launching some other applications and Notebooks. For example:scipy-stack. - The last sub-panel is the list of Available modules, similar to the output of
module avail. By clicking on a module's name, detailed information about the module is displayed. By clicking on the Load link, the module will be loaded.
Application area on right
- The Launcher tab is opened by default
- It contains all available Jupyter applications and Notebooks, depending on which modules are loaded
Status bar at the bottom
- By clicking on the icons, this brings you to the Running Terminals and Kernels tool.
Jupyter Applications
This section presents the main supported Jupyter applications on JupyterLab with the Compute Canada software stack.
Terminal
This launcher will open a terminal in a new JupyterLab tab:
- The terminal runs a (Bash) shell on the remote compute node without the need of an SSH connection
- Gives access to the remote filesystems (
/home,/project,/scratch) - Allows running compute tasks
- Gives access to the remote filesystems (
- The terminal allows copy-and-paste operations of text:
- Copy operation: select the text, then press Ctrl+C
- Note: usually, Ctrl+C is used to send a SIGINT signal to a running process, or to cancel the current command. To get this behaviour in JupyterLab's terminal, click on the terminal to deselect any text before pressing Ctrl+C
- Paste operation: press Ctrl+V
- Copy operation: select the text, then press Ctrl+C


