Configuring WSL as a ControlMaster relay server: Difference between revisions
No edit summary |
|||
| (27 intermediate revisions by 3 users not shown) | |||
| Line 1: | Line 1: | ||
<languages /> | |||
<translate> | |||
=== | <!--T:1--> | ||
{{Warning|title=Disclaimer |content=This is still an experimental procedure (work in progress).<br><br> | |||
If you have suggestions, please write to [[technical support]].}} | |||
<!--T:21--> | |||
With this procedure you can leverage ControlMaster under WSL so you may log into the clusters with several apps under native Windows for a certain period without having to use multifactor authentication for every session. | |||
=== Install Linux on Windows with WSL === <!--T:2--> | |||
Please follow this link for more detailed instructions: | |||
https://docs.alliancecan.ca/wiki/Windows_Subsystem_for_Linux_(WSL) | https://docs.alliancecan.ca/wiki/Windows_Subsystem_for_Linux_(WSL) | ||
<!--T:3--> | |||
This setup assumes the following on the sample config files: | This setup assumes the following on the sample config files: | ||
* you selected Ubuntu as your | * you selected Ubuntu as your distribution | ||
* the hostname for the WSL instance is | * the hostname for the WSL instance is <i>ubuntu</i>: <i>/etc/hostname</i> contains <i>ubuntu</i> and <i>/etc/hosts</i> contains <i>127.0.0.1 localhost ubuntu</i> | ||
* the Windows system is named | * the Windows system is named <i>smart</i> and the login name is <i>jaime</i> | ||
* the user name on the | * the user name on the Ubuntu VM is also <i>jaime</i> | ||
* the Alliance user name is | * the Alliance user name is <i>pinto</i> and we want to connect to Cedar | ||
=== Install additional packages === | === Install additional packages === <!--T:4--> | ||
<pre> | <pre> | ||
sudo apt update && sudo apt upgrade -y | sudo apt update && sudo apt upgrade -y | ||
sudo apt install openssh-server -y | sudo apt install openssh-server -y | ||
</pre> | |||
You may log in from Windows to Ubuntu with <code>ssh localhost</code>. | |||
=== General idea of the setup === <!--T:5--> | |||
=== General idea of the setup === | |||
<pre> | <pre> | ||
[ssh client] ----> [ssh relay server] ----> [ssh target server] | [ssh client] ----> [ssh relay server] ----> [ssh target server] | ||
your Windows modified authorized_keys using cedar for | your Windows modified authorized_keys using cedar for | ||
machine in your Ubuntu VM this exercise | machine in your Ubuntu VM this exercise | ||
<i>smart</i> <i>ubuntu</i> Cedar | |||
</pre> | </pre> | ||
=== | === Log into the Ubuntu VM and create a <i>custom_ssh</i> folder === <!--T:6--> | ||
<pre> | <pre> | ||
jaime@ubuntu:~$ cat custom_ssh/sshd_config | jaime@ubuntu:~$ cat custom_ssh/sshd_config | ||
| Line 40: | Line 48: | ||
Subsystem sftp /usr/lib/openssh/sftp-server | Subsystem sftp /usr/lib/openssh/sftp-server | ||
PidFile /home/jaime/custom_ssh/sshd.pid | PidFile /home/jaime/custom_ssh/sshd.pid | ||
</pre> | </pre> | ||
You may copy the ''ssh_host'' keys from ''/etc/ssh'' with: | |||
<pre>sudo cp /etc/ssh/ssh_host_ed25519_key /home/jaime/custom_ssh/</pre> | |||
=== Customize .ssh/config on | === Customize <i>.ssh/config</i> on Ubuntu === <!--T:7--> | ||
<pre> | <pre> | ||
jaime@ubuntu:~$ cat .ssh/config | jaime@ubuntu:~$ cat ~/.ssh/config | ||
Host cedar | Host cedar | ||
ControlPath ~/.ssh/cm-%r@%h:%p | ControlPath ~/.ssh/cm-%r@%h:%p | ||
| Line 55: | Line 63: | ||
</pre> | </pre> | ||
=== Customize the | === Customize the authorized keys === <!--T:8--> | ||
<pre> | <pre> | ||
jaime@ubuntu:~/custom_ssh$ cat /home/jaime/custom_ssh/authorized_keys | jaime@ubuntu:~/custom_ssh$ cat /home/jaime/custom_ssh/authorized_keys | ||
ssh-ed25519 AAAZDINzaC1lZDI1NTE5AAC1lZDIvqzlffkzcjRAaMQoTBrPe5FxlSAjRAaMQyVzN+A+ | ssh-ed25519 AAAZDINzaC1lZDI1NTE5AAC1lZDIvqzlffkzcjRAaMQoTBrPe5FxlSAjRAaMQyVzN+A+ | ||
</pre> | |||
<!--T:9--> | |||
Use the same public SSH key that you uploaded to CCDB. | |||
=== Now start the sshd server on | === Now start the sshd server on Ubuntu === <!--T:10--> | ||
<pre> | <pre> | ||
jaime@ubuntu:~/custom_ssh$ /usr/sbin/sshd -f ${HOME}/custom_ssh/sshd_config | jaime@ubuntu:~/custom_ssh$ /usr/sbin/sshd -f ${HOME}/custom_ssh/sshd_config | ||
</pre> | |||
<!--T:11--> | |||
Make sure you start the server as yourself, not as root. | |||
You will also need to start the sshd server every time you restart your computer, or after closing or restarting WSL. | |||
=== Customize .ssh/config on | === Customize <i>.ssh/config</i> on <i>smart</i> with <code>RemoteCommand</code> === <!--T:12--> | ||
<pre> | <pre> | ||
jaime@smart ~/.ssh cat config | jaime@smart ~/.ssh cat config | ||
| Line 78: | Line 89: | ||
</pre> | </pre> | ||
=== You are now ready to try to | === You are now ready to try to log into Cedar === <!--T:13--> | ||
<pre> | <pre> | ||
jaime@smart ~ | jaime@smart ~ | ||
| Line 92: | Line 103: | ||
</pre> | </pre> | ||
=== Alternative setup === | === Alternative setup === <!--T:14--> | ||
There is another way in which you could customize the | There is another way in which you could customize the authorized keys on Ubuntu and the <i>~/.ssh/config</i> on Windows such that it may work better for some Windows GUI apps that don't let you explicitly set the <code>RemoteCommand</code> (such as WinSCP). In this case you set the <code>RemoteCommand</code> on the public key: | ||
<pre> | <pre> | ||
jaime@ubuntu:~/custom_ssh$ cat /home/jaime/custom_ssh/authorized_keys | jaime@ubuntu:~/custom_ssh$ cat /home/jaime/custom_ssh/authorized_keys | ||
command="ssh cedar" ssh-ed25519 AAAZDINzaC1lZDI1NTE5AAC1lZDIvqzlffkzcjRAaMQoTBrPe5FxlSAjRAaMQyVzN+A+ | command="ssh cedar" ssh-ed25519 AAAZDINzaC1lZDI1NTE5AAC1lZDIvqzlffkzcjRAaMQoTBrPe5FxlSAjRAaMQyVzN+A+ | ||
<!--T:15--> | |||
jaime@smart ~/.ssh cat config | jaime@smart ~/.ssh cat config | ||
Host ubuntu | Host ubuntu | ||
| Line 104: | Line 116: | ||
</pre> | </pre> | ||
You may still | <!--T:16--> | ||
You may still use <code>ssh ubuntu -p 2222</code> after that from a shell on Windows. | |||
=== Setup with MobaXterm === | === Setup with MobaXterm === <!--T:17--> | ||
<!--T:18--> | |||
[[File:MobaXterm-setup.jpg]] | [[File:MobaXterm-setup.jpg]] | ||
<!--T:19--> | |||
[[File:MobaXterm-VSL-localdriveC.jpg]] | [[File:MobaXterm-VSL-localdriveC.jpg]] | ||
</translate> | |||
=== Outstanding | <!-- | ||
With this setup you may be prompt for MFA | === Outstanding challenges === | ||
With this setup you may be prompt for MFA duo authentication only on the first session. Subsequently multiple SSH sessions can be started on Cedar without MFA. This also works fine to get remote shells on Cedar from several apps running natively on Windows. We already tried for WinSCP, but we can assume it will work for other apps with some tweaks. | |||
However, what I'm realizing now is that on those very same Windows apps I'm not able to list/display the contents of the local Windows drives. Instead they all show the contents of the ubuntu relay server, which may not be what users want. I imagine in the most generic case they would like to transfer files directly between Windows and cedar, and not between Ubuntu and cedar. In any case, users may still see the contents of the Windows host mounted as the /mnt file system on Ubuntu [[Windows_Subsystem_for_Linux_(WSL)#File_access_between_Windows_and_Linux|as explained here]]. | However, what I'm realizing now is that on those very same Windows apps I'm not able to list/display the contents of the local Windows drives. Instead they all show the contents of the ubuntu relay server, which may not be what users want. I imagine in the most generic case they would like to transfer files directly between Windows and cedar, and not between Ubuntu and cedar. In any case, users may still see the contents of the Windows host mounted as the /mnt file system on Ubuntu [[Windows_Subsystem_for_Linux_(WSL)#File_access_between_Windows_and_Linux|as explained here]]. | ||
| Line 122: | Line 138: | ||
Therefore, I probably need a hand from some of you to figure this out. Alliance staff members could post suggestions in the security-mfa channel. Users in general please send email to support with the subject "WSL, ControlMaster/MFA suggestion". Thanks | Therefore, I probably need a hand from some of you to figure this out. Alliance staff members could post suggestions in the security-mfa channel. Users in general please send email to support with the subject "WSL, ControlMaster/MFA suggestion". Thanks | ||
--> | |||
Latest revision as of 17:27, 3 April 2024
This is still an experimental procedure (work in progress).
If you have suggestions, please write to technical support.
With this procedure you can leverage ControlMaster under WSL so you may log into the clusters with several apps under native Windows for a certain period without having to use multifactor authentication for every session.
Install Linux on Windows with WSL[edit]
Please follow this link for more detailed instructions:
https://docs.alliancecan.ca/wiki/Windows_Subsystem_for_Linux_(WSL)
This setup assumes the following on the sample config files:
- you selected Ubuntu as your distribution
- the hostname for the WSL instance is ubuntu: /etc/hostname contains ubuntu and /etc/hosts contains 127.0.0.1 localhost ubuntu
- the Windows system is named smart and the login name is jaime
- the user name on the Ubuntu VM is also jaime
- the Alliance user name is pinto and we want to connect to Cedar
Install additional packages[edit]
 sudo apt update && sudo apt upgrade -y
 sudo apt install openssh-server -y
You may log in from Windows to Ubuntu with ssh localhost.
General idea of the setup[edit]
[ssh client] ----> [ssh relay server] ----> [ssh target server]
your Windows     modified authorized_keys     using cedar for
  machine          in your Ubuntu VM           this exercise
 <i>smart</i>        <i>ubuntu</i>                 Cedar
Log into the Ubuntu VM and create a custom_ssh folder[edit]
jaime@ubuntu:~$ cat custom_ssh/sshd_config
Port 2222
HostKey /home/jaime/custom_ssh/ssh_host_ed25519_key
HostKey /home/jaime/custom_ssh/ssh_host_rsa_key
AuthorizedKeysFile /home/jaime/custom_ssh/authorized_keys
ChallengeResponseAuthentication no
UsePAM no
Subsystem sftp /usr/lib/openssh/sftp-server
PidFile /home/jaime/custom_ssh/sshd.pid
You may copy the ssh_host keys from /etc/ssh with:
sudo cp /etc/ssh/ssh_host_ed25519_key /home/jaime/custom_ssh/
Customize .ssh/config on Ubuntu[edit]
jaime@ubuntu:~$ cat ~/.ssh/config
Host cedar
    ControlPath ~/.ssh/cm-%r@%h:%p
    ControlMaster auto
    ControlPersist 10m
    HostName cedar.alliancecan.ca
    User pinto
Customize the authorized keys[edit]
jaime@ubuntu:~/custom_ssh$ cat /home/jaime/custom_ssh/authorized_keys
ssh-ed25519 AAAZDINzaC1lZDI1NTE5AAC1lZDIvqzlffkzcjRAaMQoTBrPe5FxlSAjRAaMQyVzN+A+
Use the same public SSH key that you uploaded to CCDB.
Now start the sshd server on Ubuntu[edit]
jaime@ubuntu:~/custom_ssh$ /usr/sbin/sshd -f ${HOME}/custom_ssh/sshd_config
Make sure you start the server as yourself, not as root. You will also need to start the sshd server every time you restart your computer, or after closing or restarting WSL.
Customize .ssh/config on smart with RemoteCommand[edit]
jaime@smart ~/.ssh cat config
Host ubuntu
        Hostname localhost
        RemoteCommand ssh cedar
You are now ready to try to log into Cedar[edit]
jaime@smart ~
$ ssh -t ubuntu -p 2222
Enter passphrase for key '/home/jaime/.ssh/id_ed25519':
Last login: Fri Mar 22 10:50:12 2024 from 99.239.174.157
================================================================================
Welcome to Cedar! / Bienvenue sur Cedar!
...
...
...
[pinto@cedar1 ~]$
Alternative setup[edit]
There is another way in which you could customize the authorized keys on Ubuntu and the ~/.ssh/config on Windows such that it may work better for some Windows GUI apps that don't let you explicitly set the RemoteCommand (such as WinSCP). In this case you set the RemoteCommand on the public key:
jaime@ubuntu:~/custom_ssh$ cat /home/jaime/custom_ssh/authorized_keys
command="ssh cedar" ssh-ed25519 AAAZDINzaC1lZDI1NTE5AAC1lZDIvqzlffkzcjRAaMQoTBrPe5FxlSAjRAaMQyVzN+A+

jaime@smart ~/.ssh cat config
Host ubuntu
        Hostname localhost
        #RemoteCommand ssh cedar
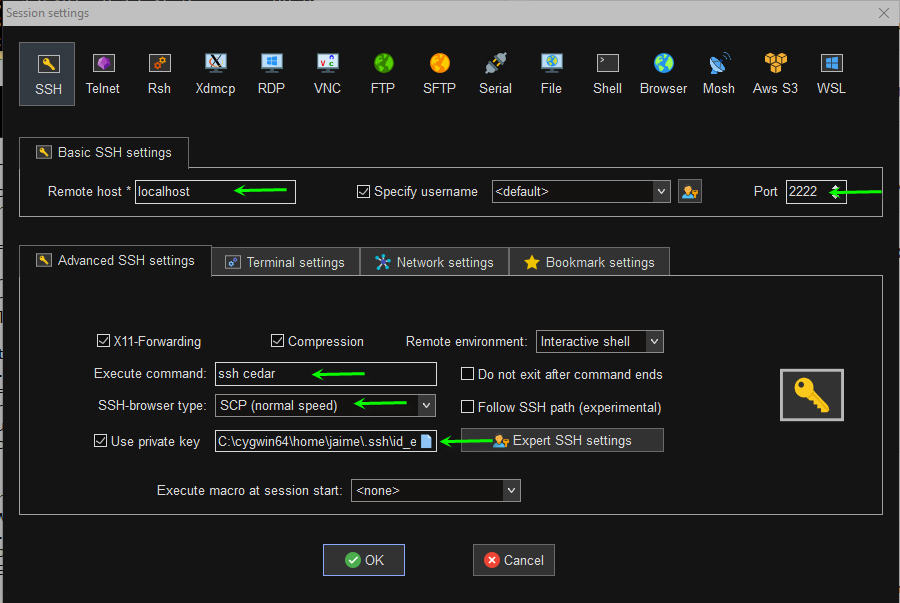
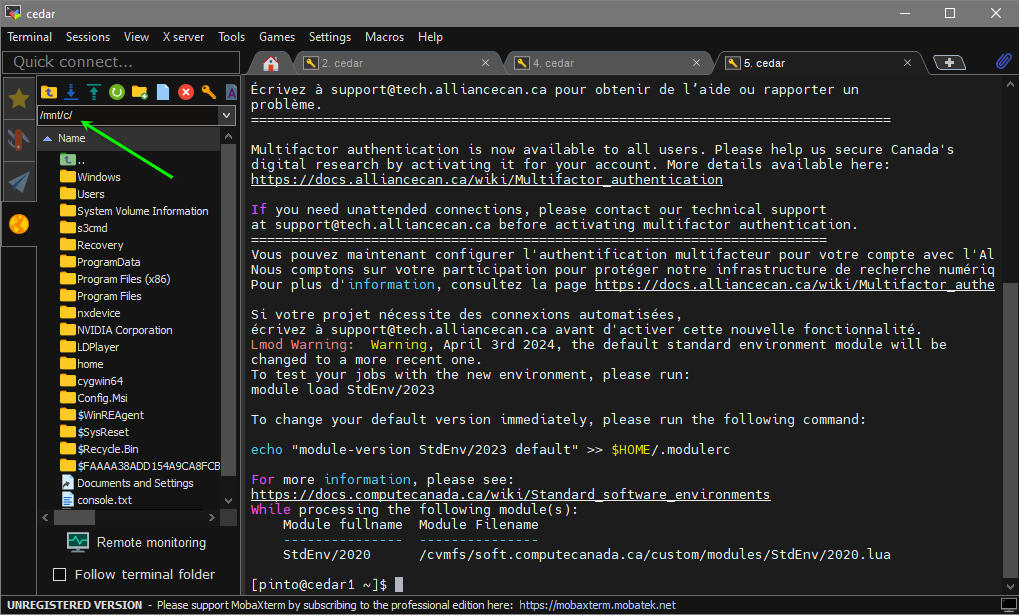
You may still use ssh ubuntu -p 2222 after that from a shell on Windows.

