Ha fip: Difference between revisions
| (29 intermediate revisions by the same user not shown) | |||
| Line 1: | Line 1: | ||
{{Draft}} | {{Draft}} | ||
== High Availability | == Floating IP High Availability== | ||
A single VM hosting an application can fail and be offline, which also makes the application inaccessible. | A single VM hosting an application can fail and be offline, which also makes the application inaccessible. | ||
| Line 6: | Line 6: | ||
To avoid such a scenario, it is possible to make the floating IP (FIP) high-available, which in turn can be used to make the application high available too. | To avoid such a scenario, it is possible to make the floating IP (FIP) high-available, which in turn can be used to make the application high available too. | ||
[[File:Setup diag.png|center]] | |||
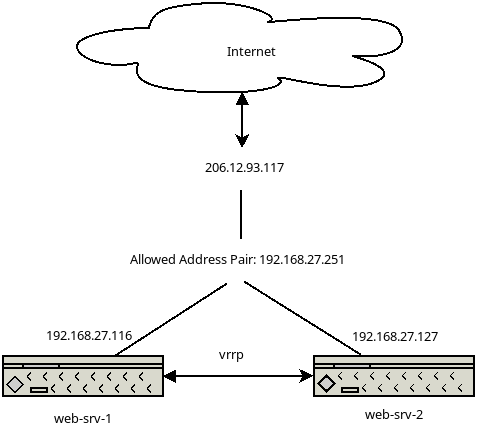
* 206.12.93.117 - Public IP the world is connecting to | |||
* 192.168.27.251 - Internal Virtual IP, own by the current active system | |||
* vrrp - virtual router redundancy protocol, determines the systems status | |||
The 2 systems communicate via vrrp and determine it's status, as long as the ''MASTER'' system responds, the other system will stay in ''BACKUP'' mode. | |||
If the ''MASTER'' system stops responding, the system will change from ''BACKUP'' into ''MASTER'' and brings up the internal IP address 192.168.27.251m which it will no be reachable on. | |||
The public IP 206.12.93.117 will be always forward any traffic to the VIP, as long as there is a system reachable via the VIP, your application will be reachable. | |||
---- | |||
==== Active-Passive High-Availability ==== | |||
The scenario in this document describes am ''active-passive'' system, where one system is own the VIP and receives all the network traffic for that IP address, while the other one simply stands by as backup system if the current active one fails or becomes unreachable. | |||
There are many way on how to achieve this goal and it depends on the desired outcome what needs to be done and configured. | |||
The setup described below will only make sure that a system is reachable via IP, it will not take care of the availability of your application data, such a files, or it's services, such a a running webserver software. | |||
This example setup will use: | |||
# 2 VMs hosting the application | # 2 VMs hosting the application | ||
# 1 VIP (shared IP) RFC1918 from within your project | # 1 VIP (shared IP) RFC1918 from within your project | ||
# 1 HA Floating IP | # 1 HA Floating IP | ||
Now it's time to build the 2 VMs and install the application on both systems, this example here will only have nginx running, | Now it's time to build the 2 VMs and install the application on both systems, this example here will only have nginx running, | ||
displaying the default index page and show that the application is reachable. | displaying the default index page and show that the application is reachable. | ||
=== Installing nginx and keepalived === | ---- | ||
==== Step 1: Installing nginx and keepalived ==== | |||
After successfully building the 2 VMs, which will share the internal VIP, install nginx and keepalived. | |||
<pre> | <pre> | ||
| Line 30: | Line 55: | ||
</pre> | </pre> | ||
=== Allocating an internal VIP === | ---- | ||
==== Step2: Allocating an internal VIP ==== | |||
IP addresses are unique identifiers, which is true within an internal, private network too, therefore we have to make sure to select a VIP which is not already used. | |||
In the left menu, go to '''Network --> Networks --> your-projectname-network'''. | |||
Select '''Ports''' in the the upper tab. | |||
[[File:Show all ports.png|center]] | [[File:Show all ports.png|center]] | ||
The network range in the example is from 192.168.27.1-254, all currently allocated addresses are listed in this port list. | |||
Once you have chosen an IP address you want to use and which is not in the port list, go to '''Compute --> Instances''' and select the first VM which can later use | |||
this VIP. | |||
Select the projects network in the '''Interfaces''' tab, then use the tab '''Allowed Address Pair'''. | |||
Enter the VIP you have chose earlier via the button '''Add Allowed Address Pair'''. | |||
[[File: | [[File:Confirm.png|center]] | ||
Repeat the exact same steps on the second server and confirm both have the IP address in the '''Allowed Address Pair''' | Repeat the exact same steps on the second server and confirm both have the IP address in the '''Allowed Address Pair''' | ||
==== Configure keepalived ==== | |||
Log in into your VM you want to configure as the active system and create the file '''/etc/keepalived/keepalived.conf'''. | |||
<code> | |||
root@web-srv-1:~# vi /etc/keepalived/keepalived.conf | |||
</code> | |||
''/etc/keepalived/keepalived.conf'' on the active system: | |||
<pre> | |||
vrrp_instance VI_1 { | |||
state MASTER <-- declare the system as the active system | |||
interface ens3 <-- NIC of the internal network | |||
virtual_router_id 50 | |||
priority 100 <-- higher priority means leading node | |||
advert_int 1 | |||
authentication { | |||
auth_type PASS | |||
auth_pass EcbCp2b1 <-- generate a new password | |||
} | |||
virtual_ipaddress { | |||
192.168.27.251 | |||
} | |||
unicast_peer { | |||
192.168.27.127 <-- internal IP of the standby system | |||
} | |||
} | |||
</pre> | |||
''/etc/keepalived/keepalived.conf'' on the passive system: | |||
<pre> | |||
vrrp_instance VI_1 { | |||
state BACKUP <-- declare the system as the standby | |||
interface ens3 | |||
virtual_router_id 50 | |||
priority 50 <-- lower priority if there is a higher on one the network, the higher one takes precedence. | |||
advert_int 1 | |||
authentication { | |||
auth_type PASS | |||
auth_pass EcbCp2b1 | |||
} | |||
virtual_ipaddress { | |||
192.168.27.251 | |||
} | |||
unicast_peer { | |||
192.168.27.116 <--- IP address of the active system | |||
} | |||
} | |||
</pre> | |||
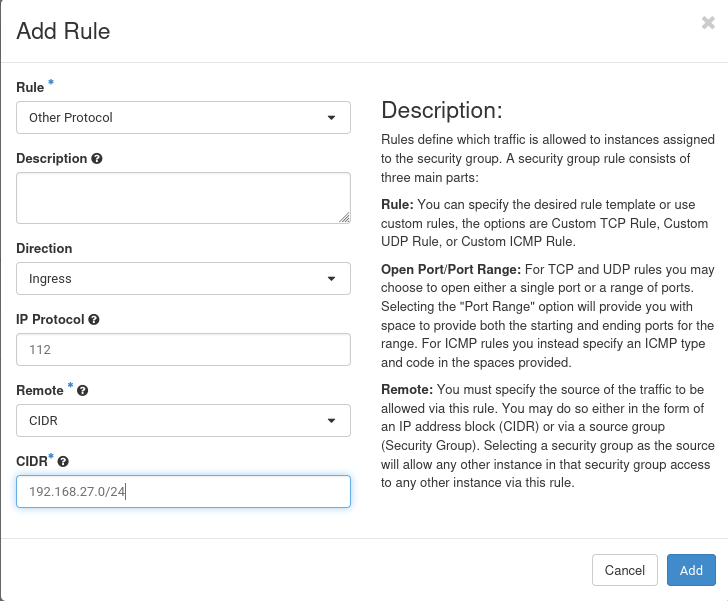
Make sure you allow the vrrp traffic between the systems, in your ''Security Groups'' and make sure it is attached to your systems. | |||
[[File:Vrrp pol.png|center]] | |||
Now it's time to start keepalived and check it's functionality. | |||
<pre> | |||
root@web-srv-1:~# systemctl enable --now keepalived | |||
Synchronizing state of keepalived.service with SysV service script with /lib/systemd/systemd-sysv-install. | |||
Executing: /lib/systemd/systemd-sysv-install enable keepalived | |||
root@web-srv-1:~# ip a s dev ens3 | |||
2: ens3: <BROADCAST,MULTICAST,UP,LOWER_UP> mtu 1500 qdisc fq_codel state UP group default qlen 1000 | |||
link/ether fa:16:3e:3e:23:46 brd ff:ff:ff:ff:ff:ff | |||
altname enp0s3 | |||
inet 192.168.27.116/24 metric 100 brd 192.168.27.255 scope global dynamic ens3 | |||
valid_lft 82678sec preferred_lft 82678sec | |||
inet 192.168.27.251/32 scope global ens3 <------ | |||
valid_lft forever preferred_lft forever | |||
inet6 fe80::f816:3eff:fe3e:2346/64 scope link | |||
valid_lft forever preferred_lft forever | |||
</pre> | |||
VRRP checked it the IP Is up and reachable, once it found out that the standby system doesn't respond and the IP is unreachable, it starts it and makes it available. | |||
When we now start it on the standby node, we will see the same checks, but the VIP will stay on the active system. | |||
---- | |||
<pre> | |||
root@web-srv-2:~# systemctl stop keepalived | |||
root@web-srv-2:~# systemctl enable --now keepalived | |||
Synchronizing state of keepalived.service with SysV service script with /lib/systemd/systemd-sysv-install. | |||
Executing: /lib/systemd/systemd-sysv-install enable keepalived | |||
root@web-srv-2:~# systemctl status keepalived | |||
â keepalived.service - Keepalive Daemon (LVS and VRRP) | |||
Loaded: loaded (/lib/systemd/system/keepalived.service; enabled; preset: enabled) | |||
[....] | |||
Jun 28 16:05:54 web-srv-2 Keepalived[2237]: Startup complete | |||
Jun 28 16:05:54 web-srv-2 systemd[1]: Started keepalived.service - Keepalive Daemon (LVS and VRRP). | |||
Jun 28 16:05:54 web-srv-2 Keepalived_vrrp[2238]: (VI_1) Entering BACKUP STATE (init) | |||
root@web-srv-2:~# ip a s dev ens3 | |||
2: ens3: <BROADCAST,MULTICAST,UP,LOWER_UP> mtu 1500 qdisc fq_codel state UP group default qlen 1000 | |||
link/ether fa:16:3e:8f:c6:ed brd ff:ff:ff:ff:ff:ff | |||
altname enp0s3 | |||
inet 192.168.27.127/24 metric 100 brd 192.168.27.255 scope global dynamic ens3 | |||
valid_lft 80957sec preferred_lft 80957sec | |||
inet6 fe80::f816:3eff:fe8f:c6ed/64 scope link | |||
valid_lft forever preferred_lft forever | |||
</pre> | |||
To test that the IP is taken over by the standby node, simply stop keepalived and check that the IP is taken over, either via '''ip a s dev ens3'' or via the systemctl status command. | |||
Active system: | |||
<pre> | |||
root@web-srv-1:~# systemctl stop keepalived | |||
root@web-srv-1:~# ip a s dev ens3 | |||
2: ens3: <BROADCAST,MULTICAST,UP,LOWER_UP> mtu 1500 qdisc fq_codel state UP group default qlen 1000 | |||
link/ether fa:16:3e:3e:23:46 brd ff:ff:ff:ff:ff:ff | |||
altname enp0s3 | |||
inet 192.168.27.116/24 metric 100 brd 192.168.27.255 scope global dynamic ens3 | |||
valid_lft 82242sec preferred_lft 82242sec | |||
inet6 fe80::f816:3eff:fe3e:2346/64 scope link | |||
valid_lft forever preferred_lft forever | |||
</pre> | |||
Passive system (owns now the VIP): | |||
<pre> | |||
root@web-srv-2:~# ip a s dev ens3 | |||
2: ens3: <BROADCAST,MULTICAST,UP,LOWER_UP> mtu 1500 qdisc fq_codel state UP group default qlen 1000 | |||
link/ether fa:16:3e:8f:c6:ed brd ff:ff:ff:ff:ff:ff | |||
altname enp0s3 | |||
inet 192.168.27.127/24 metric 100 brd 192.168.27.255 scope global dynamic ens3 | |||
valid_lft 80346sec preferred_lft 80346sec | |||
inet 192.168.27.251/32 scope global ens3 | |||
valid_lft forever preferred_lft forever | |||
inet6 fe80::f816:3eff:fe8f:c6ed/64 scope link | |||
valid_lft forever preferred_lft forever | |||
</pre> | |||
When you start keepalived again on the first system , it will take the VIP over again, if that is not desired, set the priority to equal numbers. | |||
<pre> | |||
Jun 28 16:05:54 web-srv-2 systemd[1]: Started keepalived.service - Keepalive Daemon (LVS and VRRP). | |||
Jun 28 16:05:54 web-srv-2 Keepalived_vrrp[2238]: (VI_1) Entering BACKUP STATE (init) | |||
Jun 28 16:15:04 web-srv-2 Keepalived_vrrp[2238]: (VI_1) Entering MASTER STATE | |||
Jun 28 16:22:31 web-srv-2 Keepalived_vrrp[2238]: (VI_1) Master received advert from 192.168.27.116 with higher priority 100, ours 50 | |||
Jun 28 16:22:31 web-srv-2 Keepalived_vrrp[2238]: (VI_1) Entering BACKUP STATE | |||
</pre> | |||
---- | |||
==== Allocate HA Floating IP ==== | |||
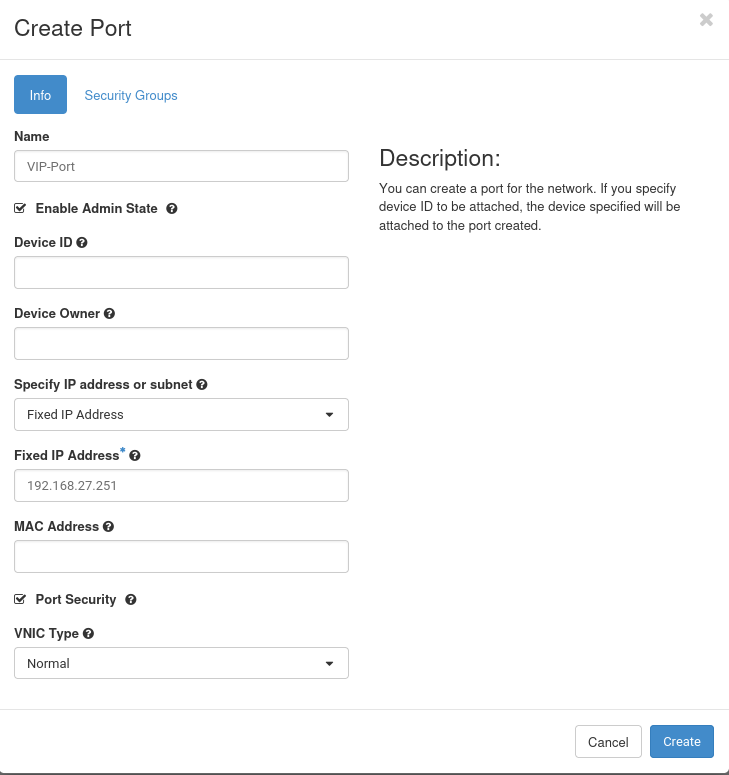
To bind the floating IP to the VIP address, we need to allocate a port for it. | |||
In '''Network --> Networks --> your-projectname-network''', click on ''Create Port'' in the upper right corner and create the port with the VIP as fixed address. | |||
[[File:Vipport.png|center]] | |||
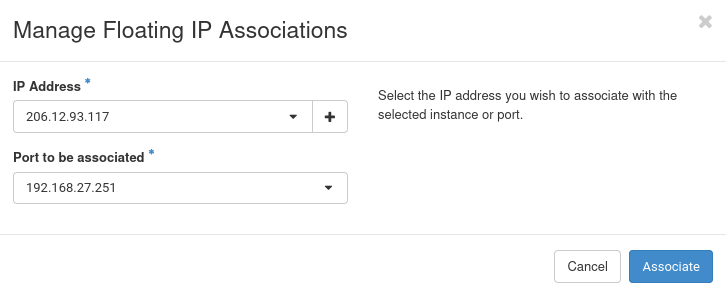
Now we are ready to allocate the FIP and associate it with the VIP. | |||
Select the FIP in '''Network --> Floating IPs''', click on ''Associate'' and select the VIP as the port to have the FIP associated with. | |||
[[File:Vipport assoc.png|center]] | |||
Click associate and wait for the ''Status'' field to show up as ''Active''. | |||
Your application and systems are now reachable from any point in the world, assuming your ''Security Groups'' allow it. You can either shutdown a system or simply stop keepalived on a single system and verify the functionality. | |||
---- | |||
[[File:Status.png|center]] | |||
Latest revision as of 17:05, 28 June 2024
This is not a complete article: This is a draft, a work in progress that is intended to be published into an article, which may or may not be ready for inclusion in the main wiki. It should not necessarily be considered factual or authoritative.
Floating IP High Availability
A single VM hosting an application can fail and be offline, which also makes the application inaccessible.
To avoid such a scenario, it is possible to make the floating IP (FIP) high-available, which in turn can be used to make the application high available too.
- 206.12.93.117 - Public IP the world is connecting to
- 192.168.27.251 - Internal Virtual IP, own by the current active system
- vrrp - virtual router redundancy protocol, determines the systems status
The 2 systems communicate via vrrp and determine it's status, as long as the MASTER system responds, the other system will stay in BACKUP mode.
If the MASTER system stops responding, the system will change from BACKUP into MASTER and brings up the internal IP address 192.168.27.251m which it will no be reachable on.
The public IP 206.12.93.117 will be always forward any traffic to the VIP, as long as there is a system reachable via the VIP, your application will be reachable.
Active-Passive High-Availability
The scenario in this document describes am active-passive system, where one system is own the VIP and receives all the network traffic for that IP address, while the other one simply stands by as backup system if the current active one fails or becomes unreachable.
There are many way on how to achieve this goal and it depends on the desired outcome what needs to be done and configured.
The setup described below will only make sure that a system is reachable via IP, it will not take care of the availability of your application data, such a files, or it's services, such a a running webserver software.
This example setup will use:
- 2 VMs hosting the application
- 1 VIP (shared IP) RFC1918 from within your project
- 1 HA Floating IP
Now it's time to build the 2 VMs and install the application on both systems, this example here will only have nginx running, displaying the default index page and show that the application is reachable.
Step 1: Installing nginx and keepalived
After successfully building the 2 VMs, which will share the internal VIP, install nginx and keepalived.
root@web-srv-1:~# apt-get update && apt-get -y dist-upgrade && apt-get install -y nginx keepalived
[...]
root@web-srv-2:~# apt-get update && apt-get -y dist-upgrade && apt-get install -y nginx keepalived
[...]
Step2: Allocating an internal VIP
IP addresses are unique identifiers, which is true within an internal, private network too, therefore we have to make sure to select a VIP which is not already used.
In the left menu, go to Network --> Networks --> your-projectname-network.
Select Ports in the the upper tab.
The network range in the example is from 192.168.27.1-254, all currently allocated addresses are listed in this port list.
Once you have chosen an IP address you want to use and which is not in the port list, go to Compute --> Instances and select the first VM which can later use this VIP.
Select the projects network in the Interfaces tab, then use the tab Allowed Address Pair.
Enter the VIP you have chose earlier via the button Add Allowed Address Pair.
Repeat the exact same steps on the second server and confirm both have the IP address in the Allowed Address Pair
Configure keepalived
Log in into your VM you want to configure as the active system and create the file /etc/keepalived/keepalived.conf.
root@web-srv-1:~# vi /etc/keepalived/keepalived.conf
/etc/keepalived/keepalived.conf on the active system:
vrrp_instance VI_1 {
    state MASTER <-- declare the system as the active system
    interface ens3 <-- NIC of the internal network
    virtual_router_id 50
    priority 100 <-- higher priority means leading node
    advert_int 1
    authentication {
        auth_type PASS
        auth_pass EcbCp2b1 <-- generate a new password
    }
    virtual_ipaddress {
      192.168.27.251
    }
    unicast_peer {
        192.168.27.127  <-- internal IP of the standby system
    }
}
/etc/keepalived/keepalived.conf on the passive system:
vrrp_instance VI_1 {
    state BACKUP <-- declare the system as the standby
    interface ens3
    virtual_router_id 50
    priority 50 <-- lower priority if there is a higher on one the network, the higher one takes precedence.
    advert_int 1
    authentication {
        auth_type PASS
        auth_pass EcbCp2b1
    }
    virtual_ipaddress {
      192.168.27.251
    }
    unicast_peer {
        192.168.27.116  <--- IP address of the active system
    }
}
Make sure you allow the vrrp traffic between the systems, in your Security Groups and make sure it is attached to your systems.
Now it's time to start keepalived and check it's functionality.
root@web-srv-1:~# systemctl enable --now keepalived
Synchronizing state of keepalived.service with SysV service script with /lib/systemd/systemd-sysv-install.
Executing: /lib/systemd/systemd-sysv-install enable keepalived

root@web-srv-1:~# ip a s dev ens3
2: ens3: <BROADCAST,MULTICAST,UP,LOWER_UP> mtu 1500 qdisc fq_codel state UP group default qlen 1000
    link/ether fa:16:3e:3e:23:46 brd ff:ff:ff:ff:ff:ff
    altname enp0s3
    inet 192.168.27.116/24 metric 100 brd 192.168.27.255 scope global dynamic ens3
       valid_lft 82678sec preferred_lft 82678sec
    inet 192.168.27.251/32 scope global ens3 <------
       valid_lft forever preferred_lft forever
    inet6 fe80::f816:3eff:fe3e:2346/64 scope link
       valid_lft forever preferred_lft forever
VRRP checked it the IP Is up and reachable, once it found out that the standby system doesn't respond and the IP is unreachable, it starts it and makes it available.
When we now start it on the standby node, we will see the same checks, but the VIP will stay on the active system.
root@web-srv-2:~# systemctl stop keepalived
root@web-srv-2:~# systemctl enable --now keepalived
Synchronizing state of keepalived.service with SysV service script with /lib/systemd/systemd-sysv-install.
Executing: /lib/systemd/systemd-sysv-install enable keepalived
root@web-srv-2:~# systemctl status keepalived
â keepalived.service - Keepalive Daemon (LVS and VRRP)
     Loaded: loaded (/lib/systemd/system/keepalived.service; enabled; preset: enabled)
    [....]

Jun 28 16:05:54 web-srv-2 Keepalived[2237]: Startup complete
Jun 28 16:05:54 web-srv-2 systemd[1]: Started keepalived.service - Keepalive Daemon (LVS and VRRP).
Jun 28 16:05:54 web-srv-2 Keepalived_vrrp[2238]: (VI_1) Entering BACKUP STATE (init)

root@web-srv-2:~# ip a s dev ens3
2: ens3: <BROADCAST,MULTICAST,UP,LOWER_UP> mtu 1500 qdisc fq_codel state UP group default qlen 1000
    link/ether fa:16:3e:8f:c6:ed brd ff:ff:ff:ff:ff:ff
    altname enp0s3
    inet 192.168.27.127/24 metric 100 brd 192.168.27.255 scope global dynamic ens3
       valid_lft 80957sec preferred_lft 80957sec
    inet6 fe80::f816:3eff:fe8f:c6ed/64 scope link
       valid_lft forever preferred_lft forever
To test that the IP is taken over by the standby node, simply stop keepalived and check that the IP is taken over, either via 'ip a s dev ens3 or via the systemctl status command.
Active system:
root@web-srv-1:~# systemctl stop keepalived
root@web-srv-1:~# ip a s dev ens3
2: ens3: <BROADCAST,MULTICAST,UP,LOWER_UP> mtu 1500 qdisc fq_codel state UP group default qlen 1000
    link/ether fa:16:3e:3e:23:46 brd ff:ff:ff:ff:ff:ff
    altname enp0s3
    inet 192.168.27.116/24 metric 100 brd 192.168.27.255 scope global dynamic ens3
       valid_lft 82242sec preferred_lft 82242sec
    inet6 fe80::f816:3eff:fe3e:2346/64 scope link
       valid_lft forever preferred_lft forever
Passive system (owns now the VIP):
root@web-srv-2:~# ip a s dev ens3
2: ens3: <BROADCAST,MULTICAST,UP,LOWER_UP> mtu 1500 qdisc fq_codel state UP group default qlen 1000
    link/ether fa:16:3e:8f:c6:ed brd ff:ff:ff:ff:ff:ff
    altname enp0s3
    inet 192.168.27.127/24 metric 100 brd 192.168.27.255 scope global dynamic ens3
       valid_lft 80346sec preferred_lft 80346sec
    inet 192.168.27.251/32 scope global ens3
       valid_lft forever preferred_lft forever
    inet6 fe80::f816:3eff:fe8f:c6ed/64 scope link
       valid_lft forever preferred_lft forever
When you start keepalived again on the first system , it will take the VIP over again, if that is not desired, set the priority to equal numbers.
Jun 28 16:05:54 web-srv-2 systemd[1]: Started keepalived.service - Keepalive Daemon (LVS and VRRP).
Jun 28 16:05:54 web-srv-2 Keepalived_vrrp[2238]: (VI_1) Entering BACKUP STATE (init)
Jun 28 16:15:04 web-srv-2 Keepalived_vrrp[2238]: (VI_1) Entering MASTER STATE
Jun 28 16:22:31 web-srv-2 Keepalived_vrrp[2238]: (VI_1) Master received advert from 192.168.27.116 with higher priority 100, ours 50
Jun 28 16:22:31 web-srv-2 Keepalived_vrrp[2238]: (VI_1) Entering BACKUP STATE
Allocate HA Floating IP
To bind the floating IP to the VIP address, we need to allocate a port for it.
In Network --> Networks --> your-projectname-network, click on Create Port in the upper right corner and create the port with the VIP as fixed address.
Now we are ready to allocate the FIP and associate it with the VIP.
Select the FIP in Network --> Floating IPs, click on Associate and select the VIP as the port to have the FIP associated with.
Click associate and wait for the Status field to show up as Active.
Your application and systems are now reachable from any point in the world, assuming your Security Groups allow it. You can either shutdown a system or simply stop keepalived on a single system and verify the functionality.


