Ha fip: Difference between revisions
| Line 22: | Line 22: | ||
The public IP 206.12.93.117 will be always forward any traffic to the VIP, as long as there is a system reachable via the VIP, your application will be reachable. | The public IP 206.12.93.117 will be always forward any traffic to the VIP, as long as there is a system reachable via the VIP, your application will be reachable. | ||
---- | |||
Revision as of 13:49, 28 June 2024
This is not a complete article: This is a draft, a work in progress that is intended to be published into an article, which may or may not be ready for inclusion in the main wiki. It should not necessarily be considered factual or authoritative.
High Availability using a floating IP
A single VM hosting an application can fail and be offline, which also makes the application inaccessible.
To avoid such a scenario, it is possible to make the floating IP (FIP) high-available, which in turn can be used to make the application high available too.
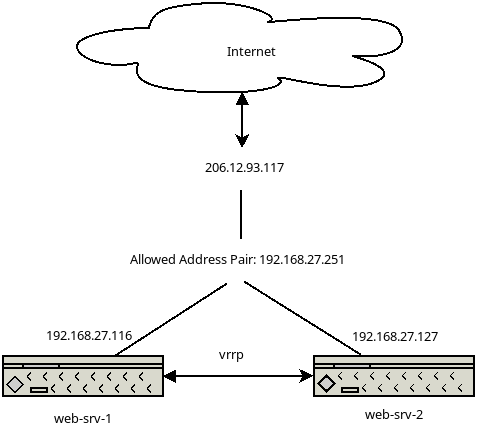
206.12.93.117 - Public IP the world is connecting to
192.168.27.251 - Internal Virtual IP, own by the current active system
vrrp - virtual router redundancy protocol, determines the systems status
The 2 systems communicate via vrrp and determine it's status, as long as the MASTER system responds, the other system will stay in BACKUP mode.
If the MASTER system stops responding, the system will change from BACKUP into MASTER and brings up the internal IP address 192.168.27.251m which it will no be reachable on.
The public IP 206.12.93.117 will be always forward any traffic to the VIP, as long as there is a system reachable via the VIP, your application will be reachable.
Active-Passive High-Availability
Active-Passive is a setup, where one system is the active one and is being used and the passive system is the standby system, which is only used when the active system becomes unavailable.
To accomplish a setup like this, we need the following:
- 2 VMs hosting the application
- 1 VIP (shared IP) RFC1918 from within your project
- 1 HA Floating IP
- plan on how to access the real VMs if you don't have IPv6 connectivity
Now it's time to build the 2 VMs and install the application on both systems, this example here will only have nginx running, displaying the default index page and show that the application is reachable.
Installing nginx and keepalived
root@web-srv-1:~# apt-get update && apt-get -y dist-upgrade && apt-get install -y nginx keepalived
[...]
root@web-srv-2:~# apt-get update && apt-get -y dist-upgrade && apt-get install -y nginx keepalived
[...]
Allocating an internal VIP
First you need to make sure you allocate a RFC1918 address which is not in use by any other VM in your project.
Click in the left menu Network --> Networks --> your-projectname-network.
In the tab menu select Ports.
This list shows you all IP address from your projects internal subnet, which are in use. In the example you can chose anything within 192.168.27.XXX.
The example configuration here will use 192.168.27.251.
Use the Compute --> Instances to show all VMs in your project, select one of the 2 you want to have high available. Select Interfaces and select the RFC1918 IP your VM automatically received when you built the VM.
In top menu, select the tab Allowed Address Pair.
Repeat the exact same steps on the second server and confirm both have the IP address in the Allowed Address Pair


