Multifactor authentication: Difference between revisions
| Line 176: | Line 176: | ||
By default, CyberDuck will open a new connection for every file transfer, prompting you for your second factor every time. To change this, go in the application's preferences, under <tt>Transfers</tt>, in the <tt>General</tt> section, use the drop-down menu beside the <tt>Transfer Files</tt> item and select <tt>Use browser connection</tt>. | By default, CyberDuck will open a new connection for every file transfer, prompting you for your second factor every time. To change this, go in the application's preferences, under <tt>Transfers</tt>, in the <tt>General</tt> section, use the drop-down menu beside the <tt>Transfer Files</tt> item and select <tt>Use browser connection</tt>. | ||
Then, ensure that the box beside <tt>Segmented downloads with multiple connections per file</tt> is not checked. | Then, ensure that the box beside <tt>Segmented downloads with multiple connections per file</tt> is not checked. It should look like the picture below. | ||
[[File:CyberDuck configuration for multifactor authentication.png|400px|CyberDuck configuration for multifactor authentication]] | [[File:CyberDuck configuration for multifactor authentication.png|400px|CyberDuck configuration for multifactor authentication]] | ||
Revision as of 14:05, 24 October 2023
Multifactor authentication (MFA) allows you to protect your account with more than a password. Once your account is configured to use this feature, you will need to enter your username and password as usual, and then perform a second action (the second factor) to access most of our services.
You can choose any of these factors for this second authentication step:
- Approving a notification on a smart device through the Duo Mobile application.
- Entering a code generated on demand.
- Pushing a button on a hardware key (YubiKey).
This feature will be progressively deployed, that is, it will not be immediately available for all our services.
Registering factors[edit]
Registering multiple factors[edit]
When you enable multifactor authentication for your account, we strongly recommend that you configure at least two options for your second factor. For example, you can use a phone and single-use codes; a phone and a hardware key; or two hardware keys. This will ensure that if you lose one factor, you can still use your other one to access your account.
To use a smartphone or tablet[edit]
- Install the Duo Mobile authentication application from the Apple Store or on Google Play. Make sure to get the correct application (see icon below). TOTP applications such as Aegis, Google Authenticator, and Microsoft Authenticator are not compatible with Duo and will fail to scan the QR code.
- Go to the CCDB, connect to your account and select My account → Multifactor authentication management.
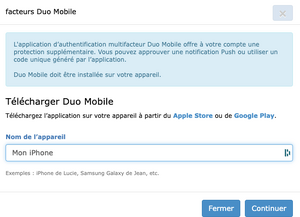
- Under Register a device, click on Duo Mobile.
- Enter a name for your device. Click on Continue. A QR code will be displayed.
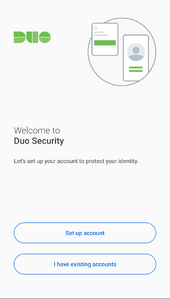
- In the Duo Mobile application, tap Set up account or the “+” sign.
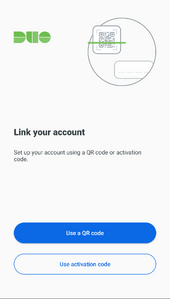
- Tap Use a QR code.
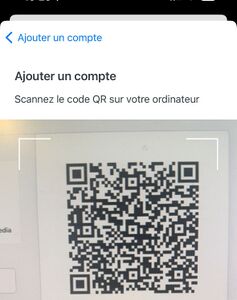
- Scan the QR code shown to you in CCDB. Important: Make sure that your mobile device is connected to the internet (over wifi or cellular data) while you are scanning the QR code.
To use a YubiKey 5[edit]
A YubiKey is a hardware token made by the Yubico company. If you do not have a smartphone or tablet, do not wish to use your phone or tablet for multifactor authentication, or are often in a situation when using your phone or tablet is not possible, then a YubiKey 5 is your best option.
Note that some YubiKey models are not compatible. We recommend using the YubiKey 5 Series.
A YubiKey 5 is the size of a small USB stick and costs between $50 and $100. Different models can fit in USB-A, USB-C, or Lightning ports, and some also support near-field communication (NFC) for use with a phone or tablet.
Among the many protocols supported by YubiKeys, the one which works with SSH connections to our clusters is the Yubico One-Time Password (OTP). After you have registered a YubiKey for multifactor authentication, when you log on to one of our clusters you will be prompted for a one-time password (OTP). You respond by touching a button on your YubiKey, which generates and transmits a string of 32 characters to complete your authentication. Using a YubiKey does not require any typing on the keyboard: the YubiKey connected to your computer “types” the 32-character string when you touch its button.
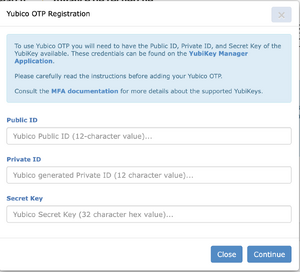
To register your YubiKey you will need its Public ID, Private ID, and Secret Key. If you have this information, go to the Multifactor authentication management page. If you do not have this information, configure your key using the steps below.
Configuring your YubiKey for Yubico OTP[edit]
- Download and install the YubiKey Manager software from the Yubico website.
- Insert your YubiKey and launch the YubiKey Manager software.
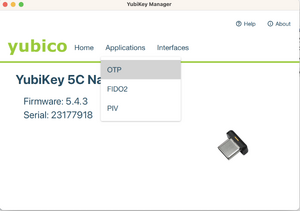
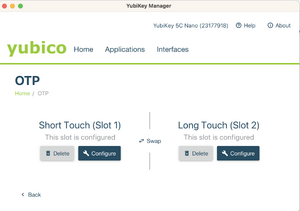
- In the YubiKey Manager software, select Applications, then OTP. (Images below illustrate this and the next few steps.)
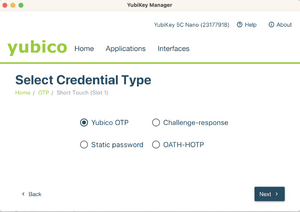
- Select Configure for either slot 1 or slot 2. Slot 1 corresponds to a short touch (pressing for 1s to 2.5), while slot 2 is a long touch on the key (pressing for 3s to 5s). Slot 1 is typically pre-registered for Yubico cloud mode. If you are already using this slot for other services, either use slot 2, or click on Swap to transfer the configuration to slot 2 before configuring slot 1.
- Select Yubico OTP.
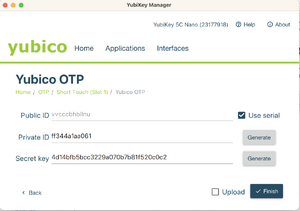
- Select Use serial, then generate a private ID and a secret key. Securely save a copy of the data in the Public ID, Private ID, and Secret Key fields before you click on Finish, as you will need the data for the next step.
- IMPORTANT: Make sure you clicked on "Finish" in the previous step.
- Log into the CCDB to register your YubiKey in the Multifactor authentication management page.
Using your second factor[edit]
When connecting via SSH[edit]
If your account has multifactor authentication enabled, when you connect via SSH to a cluster which supports MFA, you will be prompted to use your second factor after you first use either your password or your SSH key. This prompt will look like this:
[name@server ~]$ ssh cluster.computecanada.ca
Duo two-factor login for name

Enter a passcode or select one of the following options:

 1. Duo Push to My phone (iOS)

Passcode or option (1-1):
At this point, you can select which phone or tablet you want Duo to send a notification to. If you have multiple devices enrolled, you will be shown a list. You will then get a notification on your device, which you accept to complete the authentication.
If you are using a YubiKey, a backup code, or if you prefer to enter the time-based one-time password that the Duo Mobile application shows, you would write these instead of selecting an option. For example:
[name@server ~]$ ssh cluster.computecanada.ca
Duo two-factor login for name

Enter a passcode or select one of the following options:

 1. Duo Push to My phone (iOS)

Passcode or option (1-1):vvcccbhbllnuuebegkkbcfdftndjijlneejilrgiguki
Success. Logging you in...
Configuring your SSH client to only ask every so often[edit]
If you use OpenSSH to connect, you can reduce the frequency with which you are asked for a second factor. To do so, edit your .ssh/config to add the lines:
Host HOSTNAME
    ControlPath ~/.ssh/cm-%r@%h:%p
    ControlMaster auto
    ControlPersist 10m
where you would replace HOSTNAME with the host name of the server for which you want this configuration.
If you are using Windows, you can install OpenSSH using the instructions on this page. Note that you only need the client portion of these instructions.
When authenticating to our account portal[edit]
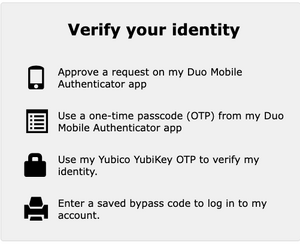
Once multifactor authentication is enabled on your account, you will be required to use it when connecting to our account portal. After entering your username and password, you will see a prompt similar to this, where you click on the option you want to use.
(Note: This screen will be updated.)
Configuring common SSH clients[edit]
Command line clients will typically support multifactor authentication without additional configuration. This is however often not the case for graphical clients. Below are instructions specifics to a few of them.
FileZilla[edit]
FileZilla will ask the password and second factor each time a transfer is initiated because by default, transfers use independent connections which are closed automatically after some idle time.
To avoid entering the password and second factor multiple times, you can limit the number of connections to each site to “1” in “Site Manager” => “Transfer Settings tab”; note that you’ll then lose the ability to browse the server during transfers.
- Launch FileZilla and select “Site Manager”
- From the “Site Manager”, create a new site (or edit an existing one)
- On the “General” tab, specify the following:
- Protocol: “SFTP – SSH File Transfer Protocol”
- Host: [the cluster login hostname]
- Logon Type: “Interactive”
- User: [your username]
- On the “Transfer Settings” tab, specify the following:
- Limit number of simultaneous connections: [checked]
- Maximum number of connections: 1
- Select “OK” to save the connection
- Test the connection
MobaXTerm[edit]
Install version 23.1 or more recent.
When connecting to a remote server, MobaXterm establishes by default two connections: the first one for the terminal and the second one for the remote file browser. By default, the file browser uses the SFTP protocol, which causes a mandatory second prompt for your second factor of authentication. To avoid that extra step, you can set the SSH-browser type to either SCP (enhanced speed) or SCP (normal speed) in the Advanced SSH settings tab of the SSH session editor:
PuTTY[edit]
Install version 0.72 or more recent.
WinSCP[edit]
Ensure that you are using SSH Keys.
PyCharm[edit]
Ensure that you are using SSH Keys.
CyberDuck[edit]
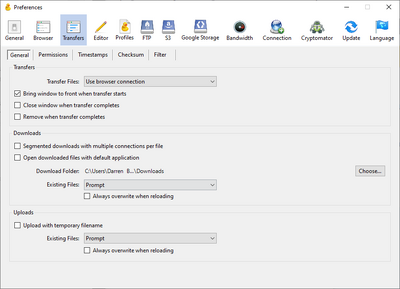
By default, CyberDuck will open a new connection for every file transfer, prompting you for your second factor every time. To change this, go in the application's preferences, under Transfers, in the General section, use the drop-down menu beside the Transfer Files item and select Use browser connection.
Then, ensure that the box beside Segmented downloads with multiple connections per file is not checked. It should look like the picture below.
Frequently asked questions[edit]
I have an Android phone which is older than Android 9. I do not find the Duo Mobile application. Can I still use Duo ?[edit]
Yes. However, you have to download the application from the Duo website. See this page for more details.
I do not have a smartphone or tablet, or they are too old. Can I still use multifactor authentication?[edit]
Yes. In this case, you need to use a YubiKey.
I have lost my second factor device. What can I do?[edit]
- If you have backup codes, or if you have more than one device, use that other mechanism to connect to your account on our account portal, and then delete your lost device from the list. Then, register a new device.
- If you do not have backup codes or have lost all of your devices, copy the following list providing answers to as many questions as you can. Email this information to support@tech.alliancecan.ca.
 What is the primary email address registered in your account?
 For how long have you had an active account with us?
 What is your research area?
 What is your IP address? (to see your IP address, point your browser to this link).
 Who is the principal investigator sponsoring your account?
 Who are your group members?
 Who can we contact to validate your request?
 Which clusters do you use the most?
 Which modules do you load most often?
 When did you run your last job?
 Provide a few of your latest job IDs.
 Provide ticket topics and ticket IDs from your recent requests for technical support.
Which SSH clients can be used when multifactor authentication is configured?[edit]
- Most clients that use a command-line interface, such as on Linux and Mac OS.
- MobaXTerm (see instructions above)
- PuTTY (see instructions above)
- Termius on iOS
- FileZilla (see instructions above)
- JuiceSSH on Android
- WinSCP (see instructions above)
- PyCharm (see instructions above)
- VSCode
- CyberDuck (see instructions above)
I need to have automated connections to the clusters through my account. Can I use multifactor authentication ?[edit]
Not at this moment. We are considering what options to implement for automation, but we do not have a general solution implemented yet. Please do not enroll into MFA at this time if you have this need - and please contact Technical support to explain your requirements.
What should I do when I receive the message "Access denied. Duo Security does not provide services in your current location" ?[edit]
This is a consequence of Duo being a US product: Duo help. You'll need to use a VPN to circumvent this, to make it appear you're coming from an unaffected country.
Advanced usage[edit]
Configuring your YubiKey for Yubico OTP using the Command Line (ykman)[edit]
- Install the command line YubiKey Manager software (
ykman) following instructions for your OS from Yubico's ykman guide. - Insert your YubiKey and read key information with the command
ykman info. - Read OTP information with the command
ykman otp info. - Select the slot you wish to program and use the command
ykman otp yubiotpto program it. - Securely save a copy of the data in the Public ID, Private ID, and Secret Key fields. You will need the data for the next step.
- Log into the CCDB to register your YubiKey in the Multifactor authentication management page.
[name@yourLaptop]$ ykman otp yubiotp -uGgP vvcccctffclk 2
Using a randomly generated private ID: bc3dd98eaa12
Using a randomly generated secret key: ae012f11bc5a00d3cac00f1d57aa0b12
Upload credential to YubiCloud? [y/N]: y
Upload to YubiCloud initiated successfully.
Program an OTP credential in slot 2? [y/N]: y
Opening upload form in browser: https://upload.yubico.com/proceed/4567ad02-c3a2-1234-a1c3-abe3f4d21c69

