Transferring data
This is not a complete article: This is a draft, a work in progress that is intended to be published into an article, which may or may not be ready for inclusion in the main wiki. It should not necessarily be considered factual or authoritative.
From your personal computer[edit]
You will need software that supports secure transfer of files between your computer and the Compute Canada machines. The command line programs scp and sftp can be used from within terminal programs on Linux or Mac OS X computers. On Microsoft Windows platforms, MobaXterm offers both file transfer and a terminal function, while WinSCP is another free program that supports file transfer. PuTTY comes with pscp and psftp which are essentially the same as the Linux and Mac command line programs.
If it takes more than about a minute to move your files to or from Compute Canada servers, you should install Globus Personal Connect and try Globus for transfers which can be set up and will then go on in the background without you. Most Compute Canada legacy systems can be reached with Globus, but not all.
Between Compute Canada resources[edit]
Globus is the preferred tool for transferring data between Compute Canada systems, and if it can be used, it should.
However, other common tools can also be found for transferring data both inside and outside of Compute Canada, including
- scp
- SFTP
- rsync
- wget
Verify or Synchronize Files After Transfer[edit]
There are several tools that you can use to verify that your files have transferred safely or sync a changed dataset to update a location.
Globus Transfer[edit]
For performance and reliabilty reasons we recommend Globus Transfer.
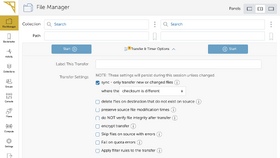
Normally when a Globus Transfer is initiated it will overwrite all the files on the destination with the files from the source, which potentially means you would transfer all of the files. Instead, if you go to the bottom of the transfer window as shown in the screenshot you can choose to "sync" instead.
This gives you the option to only transfer new or changed files if:
| Their checksums are different | This is the slowest option but most accurate. This will catch errors that may have resulted in the same size of file, but with different contents. |
| File doesn't exist on destination | This will only transfer new files that have been created since the last transfer / sync which is useful if you are incrementally creating files. |
| File size is different | A quick process that checks to see if data has been removed / added to a file so that its size changed and therefore needs to be re-transferred |
| Modification time is newer | It will check the file's recorded modification time and only transfer the file if it is newer on the source than the destination. If you want to depend on this it is important to check the "preserve source file modification times" option when initiating a Globus Transfer |
For more information about Globus please see our documentation at: https://docs.computecanada.ca/wiki/Globus
Rsync[edit]
Rsync is a popular tool for ensuring that two separate datasets are the same but can be quite slow if your dataset has a lot of files or there is a lot of latency between the two sites, i.e. they are geographically apart or on different networks. Running rsync will check the modification time and size of each file before transmitting it. If for some reason your modification times do not match on the two systems you can also run using the "-c" option which will create a checksum of the source and destination file before transferring. Generating checksums for files can slow down.
Using sha1sum checksums locally to check if files match[edit]
If the two systems have high latency, Globus Transfer is unavailable and Rsync is taking too long then you can use checksums from both systems to determine if the files match. You can use the command:
find /home/username/ -type f -print0 | xargs -0 sha1sum | tee sha1-checksum-result.log
This command will create a new file called sha1-checksum-result.log in the current directory that will contain all of the checksums for the files in /home/username/. It will also print out all of the checksums to the screen as well as it goes. If you have a lot of files or very large files you may want to run this command in the background, in a screen or tmux session etc. Anything that allow it to continue if your ssh connection times out.
After you run it on both systems you can use the diff utility to find files that don't match.
   diff sha1-checksum-result-silo.log sha1-checksum-dtn.log
   69c69
   < 017f14f6a1a194a5f791836d93d14beead0a5115  /home/username/file-0025048576-0000008
   ---
   > 8836913c2cc2272c017d0455f70cf0d698daadb3  /home/username/file-0025048576-0000008
It is possible that the find command will crawl through the directories in a different order resulting in a lot of false differences so you may need to run sort on both files before running diff such as:
sort sha1-checksum-result-silo.log -o sha1-checksum-result-silo.log sort sha1-checksum-dtn.log -o sha1-checksum-dtn.log
