Sharing data
Parent page: Storage and file management
Having to share some but not all of your data with a colleague or another research group is a common occurrence. Compute Canada systems provide a variety of mechanisms to facilitate this data sharing with colleagues. If the person you want to share the data with is a member of the same research group as you, then the best approach may be to make use of the project space that each research group has in common; if your research requires the creation of a group on one of the national clusters, you can request this by contacting technical support since users cannot create their own groups. At the opposite extreme, if the person you need to share the data with doesn't even have an account on the cluster, you can use use Globus and in particular what is called a shared endpoint to share the data. To handle the scenario of sharing with a colleague who has an account on the cluster but doesn't belong to a common research group with you, the simplest approach is to use the permissions available in the filesystem to share the data, the principal topic of this page.
When sharing a file it's important to realize that the individual you want to share it with must have access to the entire chain of directories leading from /scratch or /project to the directory in which the file is located. If we consider the metaphor of a document locked in a safe in the bedroom of your apartment in a large building, giving me the combination to the safe will not allow me to read this document if I do not also have the necessary keys to enter the apartment building, your apartment and finally your bedroom. In the context of a filesystem, this means having execute permission for each directory between the root (e.g. /scratch or /project) and the directory containing the file.
Filesystem permissions
Like most modern filesystems, those used on Compute Canada clusters support the idea of permissions to read, write, and execute files and directories. When you attempt to read, modify or delete a file, or access a directory, e.g. with cd, the Linux kernel first verifies that you have the right to do this. If not, you'll see the error message "Permission denied". For each filesystem object (file or directory) there are three categories of users:
- the object's owner --- normally the user who created the object,
- members of the object's group --- normally the same as the owner's default group, and
- everyone else.
Each of these categories of users may have the right to read, write, or execute the object. Three categories of users times three types of permission means there are nine permissions associated with each object.
You can see what the current permissions are for a filesystem object with the command
[name@server ~]$ ls -l name_of_object
which will print out the permissions for the owner, the group, and everyone else. For example, a file with permissions ‑rw‑r‑‑r‑‑ means the owner can read it and write it but not execute it, and the group members and everyone else can only read the file. You'll also see printed out the name of the object's owner and the group.
To change the permissions of a file or directory you can use the command chmod along with the user category, a plus or minus sign indicating that permission is granted or withdrawn, and the nature of the permission: read (r), write (w) or execute (x). For the user category we use the abbreviations u for the owner (user), g for the group and o for others, i.e. everyone else on the cluster. So a command like
[name@server ~]$ chmod g+r file.txt
would grant read permission to all members of the group that file.txt belongs to, while
[name@server ~]$ chmod o-x script.py
would withdraw execute permission for the file script.py to everyone but the owner and the group. We can also use the user category a to denote everyone (all), thus
[name@server ~]$ chmod a+r file.txt
grants everyone on the cluster the right to read file.txt.
It's also common for people to use "octal notation" when referring to Unix filesystem permissions even if this is somewhat less intuitive than the above symbolic notation. In this case, we use three bits to represent the permissions for each category of user, with these three bits then interpreted as a number from 0 to 7 using the formula (read_bit)*4 + (write_bit)*2 + (execute_bit)*1. In the above example the octal representation would be 4+2+0 = 6 for the owner and 4+0+0 = 4 for the group and everyone else, so 644 overall.
Note that to be able to exercise your rights on a file, you also need to be able to access the directory in which it resides. This means having both read and execute permission ("5" or "7" in octal notation) on the directory in question.
You can alter these permissions using the command chmod in conjunction with the octal notation discussed above, so for example
[name@server ~]$ chmod 777 name_of_file
means that everyone on the cluster now has the right to read, write and execute this file. Naturally you can only modify the permissions of a file or directory you own. You can also alter the group by means of the command chgrp.
The Sticky Bit
When dealing with a shared directory where multiple users have read, write and execute permission, as would be common in the project space for a professor with several active students and collaborators, the issue of ensuring that an individual cannot delete the files or directories of another can arise. For preventing this kind of behaviour the Unix filesystem developed the concept of the sticky bit by means of which the filesystem permissions for a directory can be restricted so that a file in that directory can only be renamed or deleted by the file's owner or the directory's owner. Without this sticky bit, users with write and execute permission for that directory can rename or delete any files that it may contain even if they are not the file's owner. The sticky bit can be set using the command chmod, for example
[name@server ~]$ chmod +t <directory name>
or if you prefer to use the octal notation discussed above by using the mode 1000, hence
[name@server ~]$ chmod 1774 <directory name>
to set the sticky bit and rwxrwxr-- permissions on the directory.
The sticky bit is represented in ls -l output by the letter "t" or "T" in the last place of the permissions field, like so:
$ ls -ld directory
drwxrws--T 2 someuser def-someuser 4096 Sep 25 11:25 directory
The sticky bit can be unset by the command
[name@server ~]$ chmod -t <directory name>
or via octal notation,
[name@server ~]$ chmod 0774 <directory name>
In the context of the project space, the directory owner will be the PI who sponsors the roles of the students and collaborators.
Set Group ID (SGID)
When creating files and directories within a parent directory it is often useful to match the group-ownership of the new files or directories to the parent directory's owner or group automatically. This is key to the operation of the Project filesystems at Graham and Cedar, for example, since storage quotas in Project spaces are enforced by group.
If Set Group ID (SGID) permission is turned on for a directory, new files and directories in that directory will be created with the same group-ownership as the directory. To illustrate the use of SGID let us walk through an example.
Start by checking the groups that someuser belongs to with the groups command.
[someuser@server]$ groups
someuser def-someuser
someuser belongs to two groups someuser and def-someuser. In the current working directory there is a directory which belongs to the group def-someuser.
[someuser@server]$ ls -l
drwxrwx---  2 someuser   def-someuser       4096 Oct 13 19:39 testDir
If we create a new file in that directory we can see that it is created belonging to someuser's default group someuser.
[someuser@server]$ touch dirTest/test01.txt
[someuser@server]$ ls -l dirTest/
-rw-rw-r-- 1 someuser   someuser    0 Oct 13 19:38 test01.txt
If we are in /project this is probably not what we want. We want a newly created file to belong to the same group as the parent folder. Set the SGID permission on the parent directory like so:
[someuser@server]$ chmod g+s dirTest
[someuser@server]$ ls -l
drwxrws---  2 someuser   def-someuser       4096 Oct 13 19:39 dirTest
Notice that the x permission on the group permissions has changed to an s. Now newly created files in dirTest will have the same group as the parent directory.
[someuser@server]$ touch dirTest/test02.txt
[someuser@server]$ ls -l dirTest
-rw-rw-r-- 1 someuser   someuser      0 Oct 13 19:38 test01.txt
-rw-rw-r-- 1 someuser   def-someuser  0 Oct 13 19:39 test02.txt
If we create a directory inside a directory with the SGID set it will have the same group as the parent folder and also have its SGID set.
[someuser@server]$ mkdir dirTest/dirChild
[someuser@server]$ ls -l dirTest/
-rw-rw-r-- 1 someuser   someuser      0 Oct 13 19:38 test01.txt
-rw-rw-r-- 1 someuser   def-someuser  0 Oct 13 19:39 test02.txt
drwxrwsr-x 1 someuser   def-someuser  0 Oct 13 19:39 dirChild
Finally it can be important to note the difference between a S (upper-case S) and s. The upper-case S indicates that execute permissions have been removed from the directory but the SGID is still in place. It can be easy to miss this and may result in unexpected problems, such as others in the group not being able to access files within your directory.
[someuser@server]$ chmod g-x dirTest/
[someuser@server]$ ls -l
drwxrS---  3 someuser   def-someuser       4096 Oct 13 19:39 dirTest
Default filesystem permissions
Default filesystem permissions are defined by something called the umask. There is a default value that is defined on any Linux system. To display the current value in your session, you can run the command
[name@server ~]$ umask -S
For example, on Graham, you would get
[user@gra-login1]$ umask -S
u=rwx,g=rx,o=
This means that, by default, new files that you create can be read, written and executed by yourself, they can be read and executed by members of the group of the file, and they cannot be accessed by other people. The umask only applies to new files. Changing the umask does not change the access permissions of existing files.
There may be reasons to define default permissions more permissive (for example, to allow other people to read and execute files), or more restrictive (not allowing your group to read or execute files). Setting your own umask can be done either in a session, or in your .bashrc file, by calling the command
[name@server ~]$ umask <value>
where the <value> can take a number of octal values. Below is a table of useful options, depending on your use case :
umask value |
umask meaning |
Human-readable explanation |
|---|---|---|
| 077 | u=rwx,g=,o= | Files are readable, writable and executable by the owner only |
| 027 | u=rwx,g=rx,o= | Files are readable and executable by the owner and the group, but writable only by the owner |
| 007 | u=rwx,g=rwx,o= | Files are readable, writable and executable by the owner and the group |
| 022 | u=rwx,g=rx,o=rx | Files are readable and executable by everyone, but writable only by the owner |
| 002 | u=rwx,g=rwx,o=rx | Files are readable and executable by everyone, but writable only by the owner and the group |
The umask is not the only thing that determines who can access a file.
- A user trying to access a file must have execute permission on all directories in the path to the file. For example, a file might have
o=rxpermissions but an arbitrary user could not read or execute it if the parent directory does not also haveo=xpermission. - The user trying to access a file based on its group permissions must be a member of the file's group.
- You can explicitly change the permissions on a file or directory after it is created, using
chmod. - Access Control Lists (ACLs) also determine who can access a file.
Change of the default umask on Cedar, Béluga and Niagara
In the summer 2019, we discovered that the default umask was not the same on all Compute Canada servers. In the fall of 2019, we will be changing the default umask on these three servers to match the one from Graham. The default umask will change as follows:
| Cluster | umask before the change |
umask after the change
|
|---|---|---|
| Béluga | 002 | 027 |
| Cedar | 002 | 027 |
| Niagara | 022 | 027 |
This will mean that more restrictive permissions will be enforced on newly created files. If you need more permissive permissions for your workflow, you can change your default umask in your .bashrc. Our general advise is however to keep the default permissions.
Note that this change does not mean that your files have been inappropriately exposed in the past. Restrictive access permissions have been set on your home, project, and scratch directories since the beginning. Unless the permissions were changed to give execute permission on one of these folders to others, your files still cannot be accessed by other people.
Changing the permissions of existing files
If you want to change the permissions of existing files to match the new default permissions, you can use the chmod command as follow:
[name@server ~]$ chmod g-w,o-rx <file>
or, if you want to do it for a whole directory, you can run
[name@server ~]$ chmod -R g-w,o-rx <directory>
Access control lists (ACLs)
Sharing Access with an Individual
The file permissions discussed above have been available in Unix-like operating systems for decades now but they are very coarse-grained. The whole set of users is divided into just three categories: the owner, the group, and everyone else. What if you want to allow someone who isn't in a group to read a file - do you really need to make the file readable by everyone in that case? The answer, happily, is no. Compute Canada's national systems offer access control lists (ACLs) to enable permissions to be set on a user-by-user basis if desired. The two commands needed to manipulate these extended permissions are
- getfacl to see the ACL permissions, and
- setfacl to alter them.
Sharing a single file
To allow a single person with username smithj to have read and execute permission on the file my_script.py, use:
$ setfacl -m u:smithj:rx my_script.py
Sharing a subdirectory
To allow read and write access to a single user in a whole subdirectory, including new files created in it, you can run the following commands:
$ setfacl -d -m u:smithj:rwx /home/<user>/projects/def-<PI>/shared_data
$ setfacl -R -m u:smithj:rwx /home/<user>/projects/def-<PI>/shared_data
The first command sets default access rules to directory /home/<user>/projects/def-<PI>/shared_data, so any file or directory created within it will inherit the same ACL rule. It is required for new data. The second command sets ACL rules to directory /home/<user>/projects/def-<PI>/shared_data and all its content currently in it. So it is applicable only to existing data.
In order for this method to work the following things need to be in place:
- The directory,
/home/smithj/projects/def-smithj/shared_datain our example, must be owned by you. - Parent directories (and parents of parents, etc.) of the one you are trying to share must allow execute permission to the user you are trying to share with. This can be supplied with
setfacl u:smithj:x ...in this example, or it can be supplied by allowing everyone entry, i.e.chmod o+x .... They do not need to have public read permission. In particular you will need to grant execute permission on the project directory (/projects/def-<PI>) either for everyone, or one-by-one to all the people you are trying to share your data with.
Data Sharing Groups
For more complicated data sharing scenarios (those involving multiple people on multiple clusters), it is also possible to create a data sharing group. A data sharing group is a special group to which all people with whom certain data is to be shared are added. This group is then given access permissions through ACLs.
You do not need a data sharing group except in specialized sharing circumstances.
Creating a data sharing group
The steps below describe how to create a data sharing group. In this example it is called wg-datasharing
1. Send email to support@computecanada.ca requesting creation of data sharing group, indicate name of the group you would like to have and that you should be the owner.
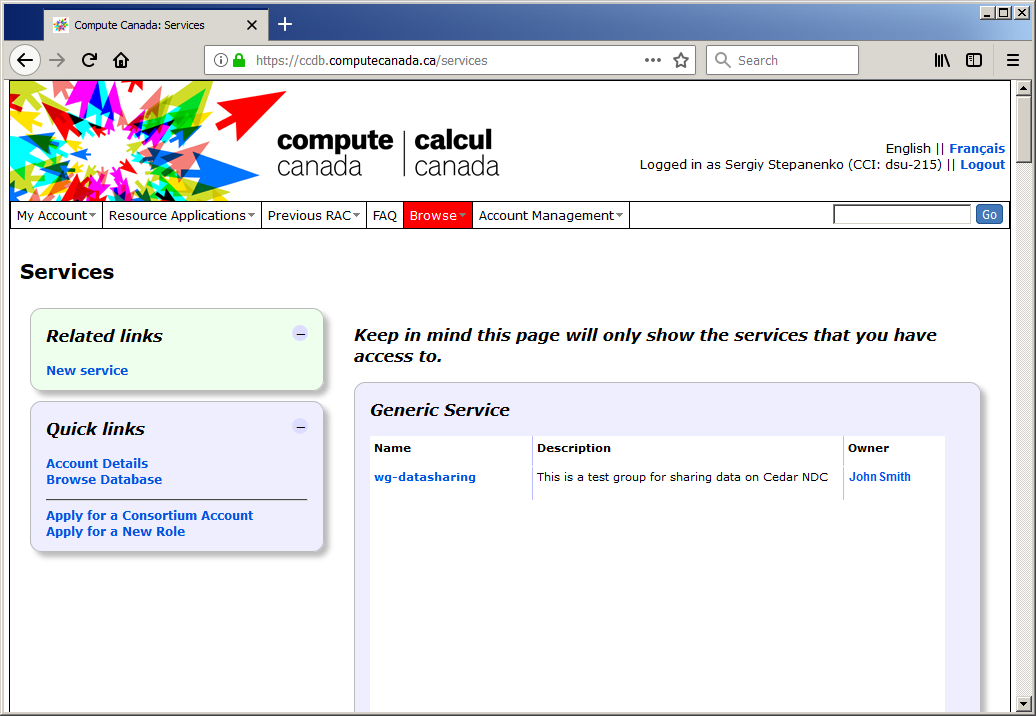
2. When you receive confirmation from Compute Canada Support that the group has been created, go to ccdb.computecanada.ca/services/ and access it:

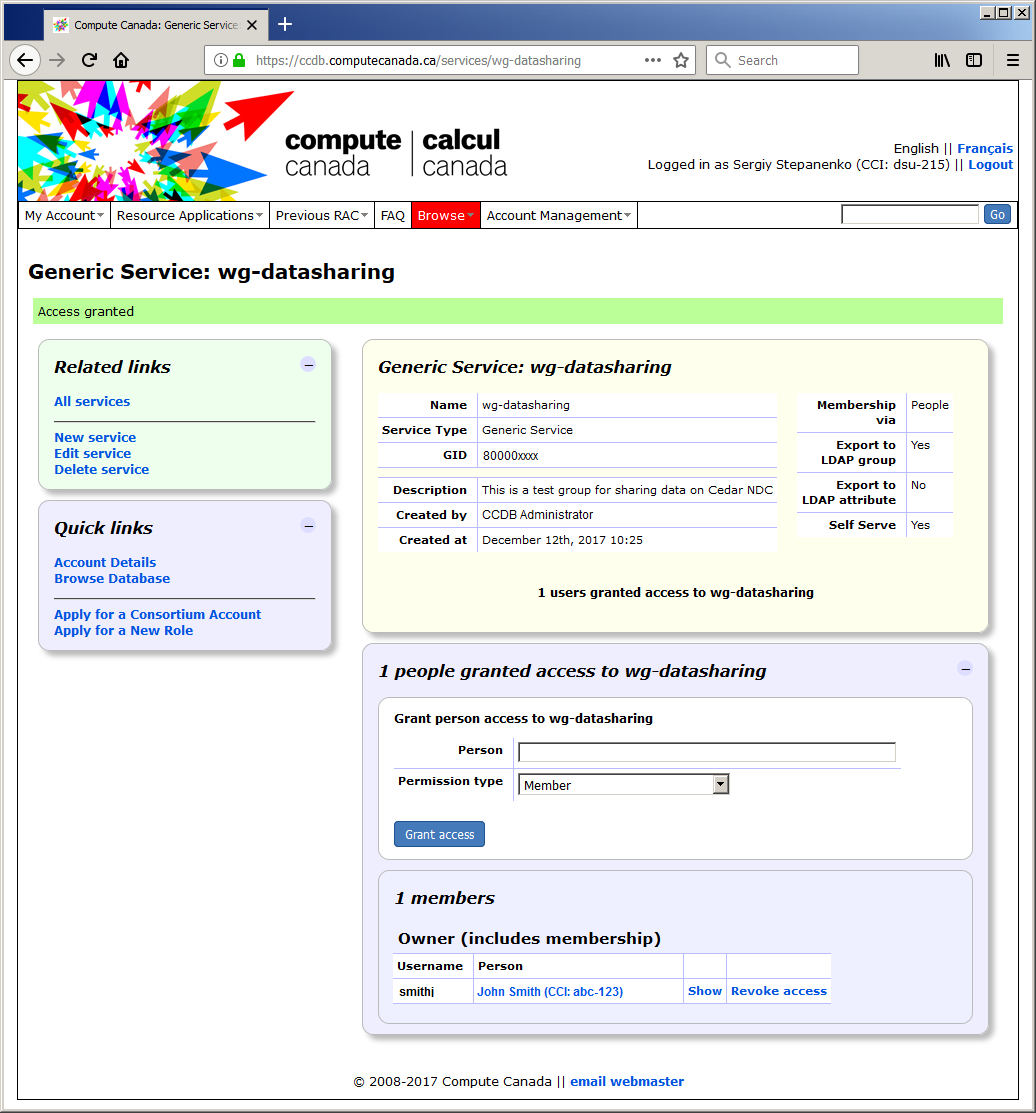
3. Click on the group's name and enter the group management screen:

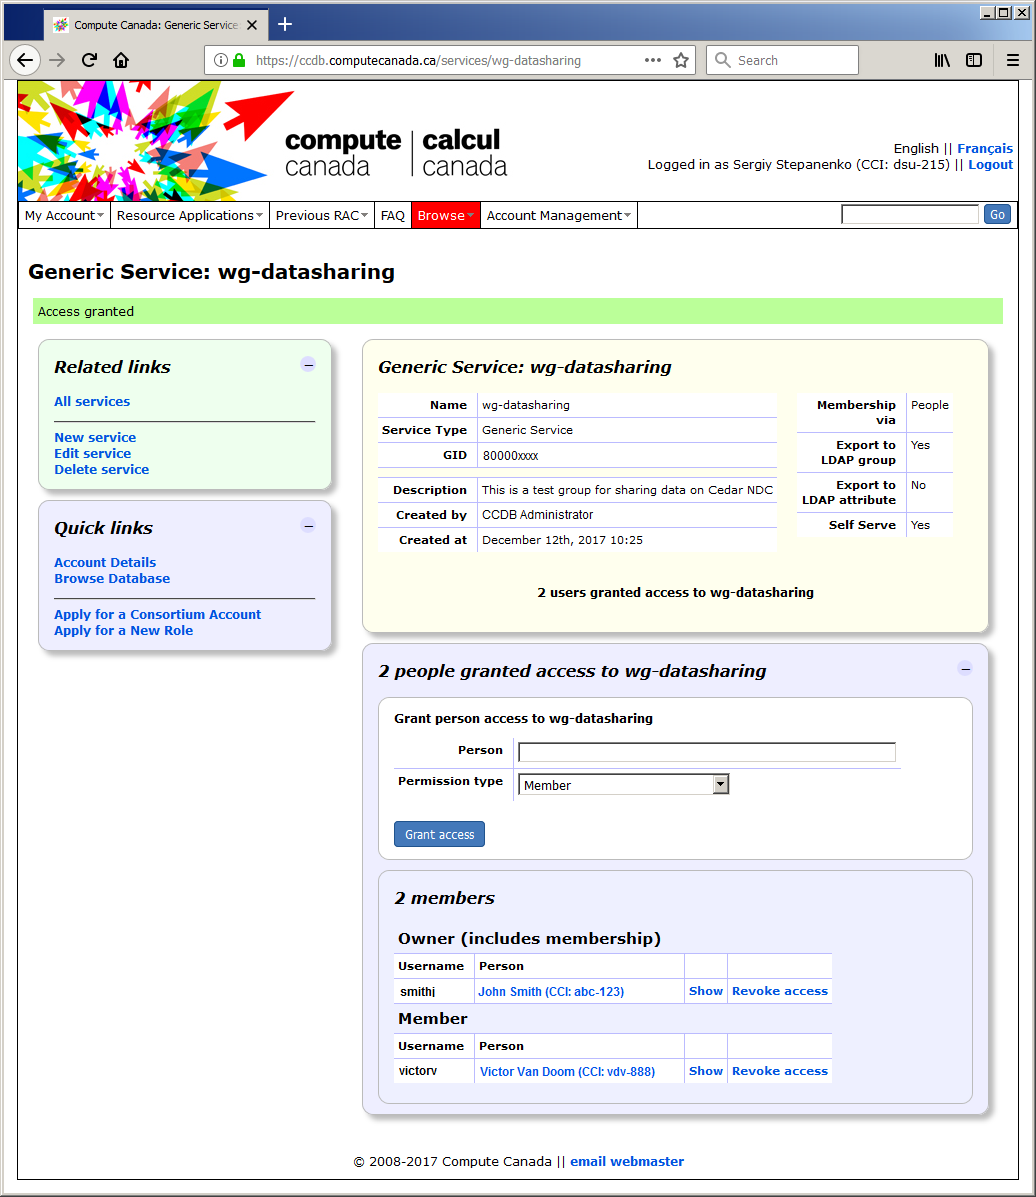
4. Add member (Victor Van Doom with CCI vdv-888, for example) to the group as a member:

Using a data sharing group
Just as with individual user sharing, the parent directories of the data you are trying to share must have execute permissions either for everyone or for the data sharing group. In your project directory, this implies that your PI must give consent as follows (unless you have permission to do this yourself):
$ chmod o+X /project/def-<PI>/or
$ setfacl g:wg_datasharing:X /project/def-<PI>/Finally, you can add your group to the ACL for the directory you are trying to share. The command parallel those needed to share with an individual:
$ setfacl -d -m g:wg-datasharing:rwx /home/<user>/projects/def-<PI>/shared_data
$ setfacl -R -m g:wg-datasharing:rwx /home/<user>/projects/def-<PI>/shared_data