JupyterLab
This is not a complete article: This is a draft, a work in progress that is intended to be published into an article, which may or may not be ready for inclusion in the main wiki. It should not necessarily be considered factual or authoritative.
Introduction
JupyterLab is now the recommended general-purpose user interface to use on a JupyterHub. From a JupyterLab server, you can manage your remote files and folders, and you can launch Jupyter applications like a Terminal, (Python 3) Notebooks, RStudio and a Linux Desktop.
The section JupyterHub#Compute_Canada_initiatives contains the list of available Jupyter Hubs at Compute Canada. Compute Canada credentials are used for authentication.
Launching a JupyterLab server as a job
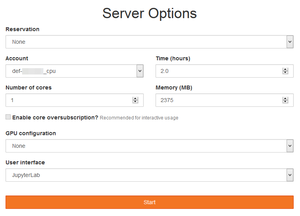
On Béluga and Hélios, once the authentication is done on JupyterHub, your Web browser is redirected to either a previously launched Jupyter server or a form that allows you to configure and submit a new interactive session on the cluster. In any case, the JupyterLab server is running on dedicated compute resources.
In the Server Options form, you can:
- Select the compute account to be used (any
def-*,rrg-*,rpp-*orctb-*account you have access to) - Set the amount of hours required for the session
- Set the number of CPU cores that will be reserved on a single node
- Set the amount of memory for the entire session
- Select zero or one GPU
- Select a User Interface - this is where JupyterLab should be selected
The JupyterLab Interface
asdf
