VisIt: Difference between revisions
No edit summary |
No edit summary |
||
| Line 4: | Line 4: | ||
<!--T:2--> | <!--T:2--> | ||
VisIt requires the same major version | VisIt requires the same major version on the local client and the remote host; this prevents incompatibilities that typically show as a failed handshake when establishing the client-server connection. | ||
<!--T:3--> | <!--T:3--> | ||
| Line 14: | Line 14: | ||
<!--T:53--> | <!--T:53--> | ||
<tab name="Cedar and Graham"> | <tab name="Cedar and Graham"> | ||
<!--T:8--> | <!--T:8--> | ||
Two versions of VisIt are installed: visit/2.12.3 and visit/2.13.0. To use remote VisIt in client-server mode, on your laptop you need the matching major version, either 2.12.x or 2.13.x. Before starting VisIt, download the host profile XML file [https://owncloud.westgrid.ca/index.php/s/HGxHPO2fPspdb0O/download host_cedar.xml]. | |||
<br> | |||
* On Linux/Mac, copy the file to ''~/.visit/hosts/''. | |||
* On Windows, copy the file to ''My Documents\VisIt 2.13.0\hosts\''. Start VisIt on your laptop; in the main menu, under ''Options -> Host Profiles'', you should see the ''cedar'' host profile. If you want to do remote rendering on Graham instead, set | |||
<!--T:9--> | <!--T:9--> | ||
| Line 25: | Line 26: | ||
<!--T:10--> | <!--T:10--> | ||
For both Cedar and Graham, set your CCDB username | For both Cedar and Graham, set your CCDB username. | ||
<!--T:11--> | <!--T:11--> | ||
| Line 37: | Line 38: | ||
<!--T:14--> | <!--T:14--> | ||
In the same setup window | In the same setup window, click on the ''Launch Profiles'' tab. You should see two profiles (''login'' and ''slurm''): | ||
<!--T:15--> | <!--T:15--> | ||
| Line 43: | Line 44: | ||
<!--T:16--> | <!--T:16--> | ||
* The ''login'' profile is for running | * The ''login'' profile is for running the engine on a login node, which we do not recommend for heavy visualizations. | ||
* The ''slurm'' profile is for running | * The ''slurm'' profile is for running the engine inside an interactive job on a compute node. If you are planning to do the this, select the ''slurm'' profile and then click on the ''Parallel'' tab and below it on the ''Advanced'' tab. In the ''Launcher arguments'' field, replace ''--account=def-someuser'' by your default allocation, as shown below: | ||
<!--T:17--> | <!--T:17--> | ||
| Line 50: | Line 51: | ||
<!--T:18--> | <!--T:18--> | ||
Save settings with Options - Save Settings and then restart VisIt on your laptop for settings to take effect. Start the file-open dialogue and | Save the settings with ''Options -> Save Settings'' and then restart VisIt on your laptop for settings to take effect. Start the file-open dialogue and change the localhost to ''cedar'' (or ''graham''). Hopefully, the connection is established, the remote VisIt Component Launcher gets started on the cluster's login node, and you should be able to see the cluster's filesystem, navigate to your file and select it. You will be prompted to select either the ''login'' (rendering on the login node) or ''slurm'' (rendering inside an interactive Slurm job on a compute node) profile. If you select the ''slurm'' profile, you will need to specify the number of nodes and processors and the maximum time limit: | ||
<!--T:19--> | <!--T:19--> | ||
| Line 56: | Line 57: | ||
<!--T:20--> | <!--T:20--> | ||
Click | Click on ''OK'' and wait for VisIt's engine to start. If you selected rendering on a compute node, it may take some time for your job to get started. Once your dataset appears in the ''Active source'', the VisIt's engine is running and you can proceed with creating and drawing your plot. | ||
<!--T:21--> | <!--T:21--> | ||
| Line 62: | Line 63: | ||
<tab name="Niagara"> | <tab name="Niagara"> | ||
=== VisIt configuration === <!--T:23--> | |||
=== VisIt | |||
<!--T:24--> | <!--T:24--> | ||
For VisIt to connect to the Niagara cluster, you need to | For VisIt to connect to the Niagara cluster, you need to configure your host through one of the following methods: | ||
=== | === Host configuration file === <!--T:25--> | ||
<!--T:26--> | <!--T:26--> | ||
Download the Niagara host file, right-click on [https://support.scinet.utoronto.ca/~mponce/viz/host_niagara.xml host_niagara.xml] and select ''Save as''. | |||
Depending on the OS you are using on your local machine: | Depending on the OS you are using on your local machine: | ||
< | <br> | ||
* On Linux/Mac, place the file in <code>~/.visit/hosts/</code>. | |||
* On Windows, place the file in <code>My Documents\VisIt 2.13.0\hosts\</code>. | |||
<!--T:27--> | <!--T:27--> | ||
Restart VisIt and check that the | Restart VisIt and check that the Niagara profile is available under ''Options -> Host Profiles''. | ||
=== Manual | === Manual host configuration === <!--T:28--> | ||
<!--T:29--> | <!--T:29--> | ||
Open VisIt in your computer, go to the ''Options'' menu, and click on ''Host Profiles''. | |||
Open VisIt in your computer, go to the 'Options' menu, and click on | Then click on ''New Host'' and select: | ||
Then click on 'New Host' and select: | |||
<!--T:30--> | <!--T:30--> | ||
| Line 96: | Line 93: | ||
<!--T:31--> | <!--T:31--> | ||
Check ''Tunnel data connections through SSH'' and click on ''Apply''. | |||
<!--T:32--> | <!--T:32--> | ||
| Line 104: | Line 101: | ||
<!--T:33--> | <!--T:33--> | ||
At the top of the window, click on the ''Launch Profiles'' tab to create a profile: | |||
<br> | |||
< | * <code>login</code> to connect through a login node and access data; | ||
* <code>slurm</code> to using compute nodes as rendering engines. | |||
<!--T:34--> | <!--T:34--> | ||
| Line 123: | Line 119: | ||
<!--T:36--> | <!--T:36--> | ||
Finally, after you are done with these changes, go to the | Finally, after you are done with these changes, go to the ''Options'' menu and select ''Save settings'', so that your changes are saved and available next time you launch VisIt. | ||
<!--T:37--> | <!--T:37--> | ||
</tab> | </tab> | ||
<tab name="Cloud VM"> | <tab name="Cloud VM"> | ||
=== Prerequisites === <!--T:39--> | === Prerequisites === <!--T:39--> | ||
| Line 171: | Line 165: | ||
<!--T:51--> | <!--T:51--> | ||
Start VisIt on your laptop | Start VisIt on your laptop. In ''Options -> Host profiles'', edit the connection nickname (let's call it Cloud West), the VM host name, the path to the VisIt installation (/home/centos/visit) and your username on the VM; also enable tunneling through SSH. Don't forget to save your settings with ''Options -> Save Settings''. TWhen you open a gile (''File -> Open file -> Host = Arbutus'') you should see the VM's filesystem. Load a file and try to visualize it. Data processing and rendering should be done on the VM, while the result and the GUI controls will be displayed on your laptop. | ||
<!--T:52--> | <!--T:52--> | ||
Revision as of 19:22, 12 March 2019
Client-server visualization[edit]
VisIt requires the same major version on the local client and the remote host; this prevents incompatibilities that typically show as a failed handshake when establishing the client-server connection.
Please use the tabs below to select the remote system.
Two versions of VisIt are installed: visit/2.12.3 and visit/2.13.0. To use remote VisIt in client-server mode, on your laptop you need the matching major version, either 2.12.x or 2.13.x. Before starting VisIt, download the host profile XML file host_cedar.xml.
- On Linux/Mac, copy the file to ~/.visit/hosts/.
- On Windows, copy the file to My Documents\VisIt 2.13.0\hosts\. Start VisIt on your laptop; in the main menu, under Options -> Host Profiles, you should see the cedar host profile. If you want to do remote rendering on Graham instead, set
Host nickname = graham
Remote host name = graham.computecanada.ca
For both Cedar and Graham, set your CCDB username.
Username = yourOwwUserName
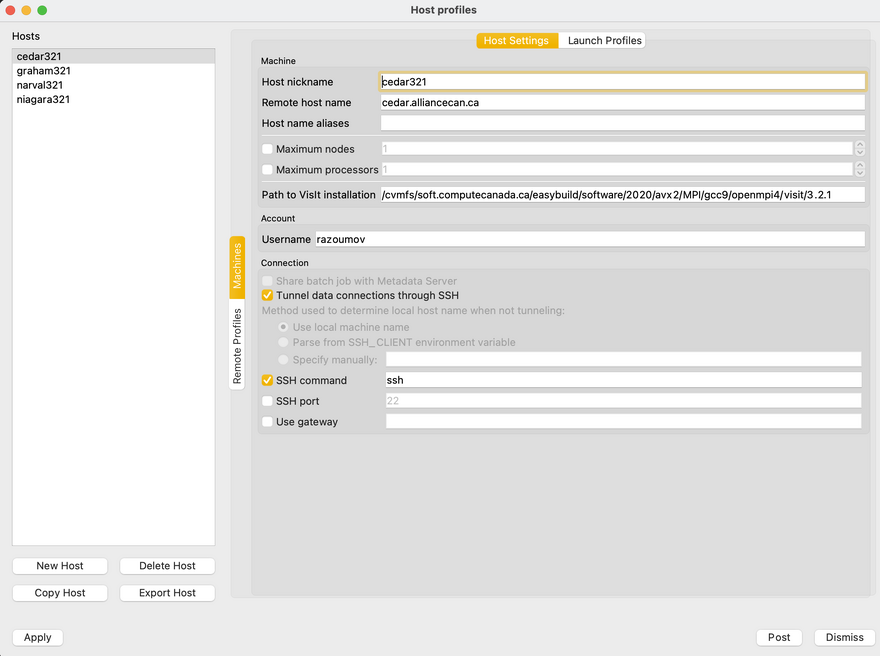
With the exception of your username, your settings should be similar to the ones shown below:
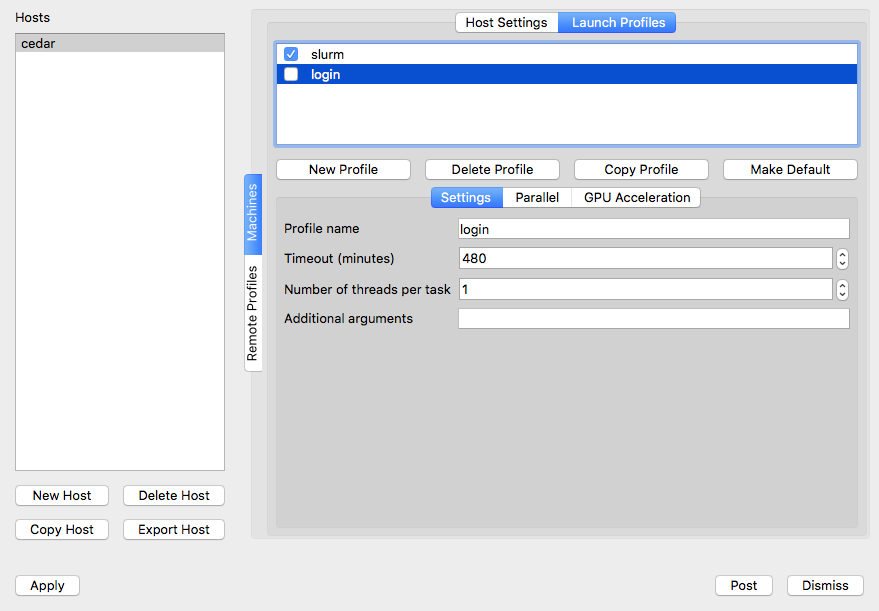
In the same setup window, click on the Launch Profiles tab. You should see two profiles (login and slurm):
- The login profile is for running the engine on a login node, which we do not recommend for heavy visualizations.
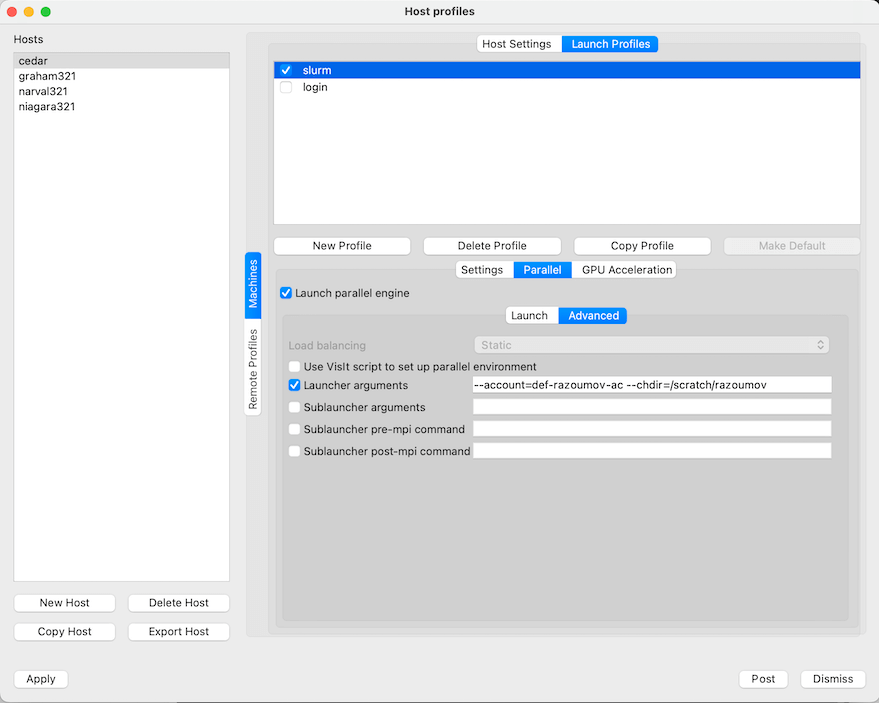
- The slurm profile is for running the engine inside an interactive job on a compute node. If you are planning to do the this, select the slurm profile and then click on the Parallel tab and below it on the Advanced tab. In the Launcher arguments field, replace --account=def-someuser by your default allocation, as shown below:
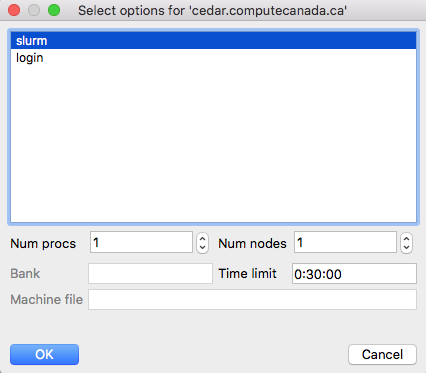
Save the settings with Options -> Save Settings and then restart VisIt on your laptop for settings to take effect. Start the file-open dialogue and change the localhost to cedar (or graham). Hopefully, the connection is established, the remote VisIt Component Launcher gets started on the cluster's login node, and you should be able to see the cluster's filesystem, navigate to your file and select it. You will be prompted to select either the login (rendering on the login node) or slurm (rendering inside an interactive Slurm job on a compute node) profile. If you select the slurm profile, you will need to specify the number of nodes and processors and the maximum time limit:
Click on OK and wait for VisIt's engine to start. If you selected rendering on a compute node, it may take some time for your job to get started. Once your dataset appears in the Active source, the VisIt's engine is running and you can proceed with creating and drawing your plot.
VisIt configuration[edit]
For VisIt to connect to the Niagara cluster, you need to configure your host through one of the following methods:
Host configuration file[edit]
Download the Niagara host file, right-click on host_niagara.xml and select Save as.
Depending on the OS you are using on your local machine:
- On Linux/Mac, place the file in
~/.visit/hosts/. - On Windows, place the file in
My Documents\VisIt 2.13.0\hosts\.
Restart VisIt and check that the Niagara profile is available under Options -> Host Profiles.
Manual host configuration[edit]
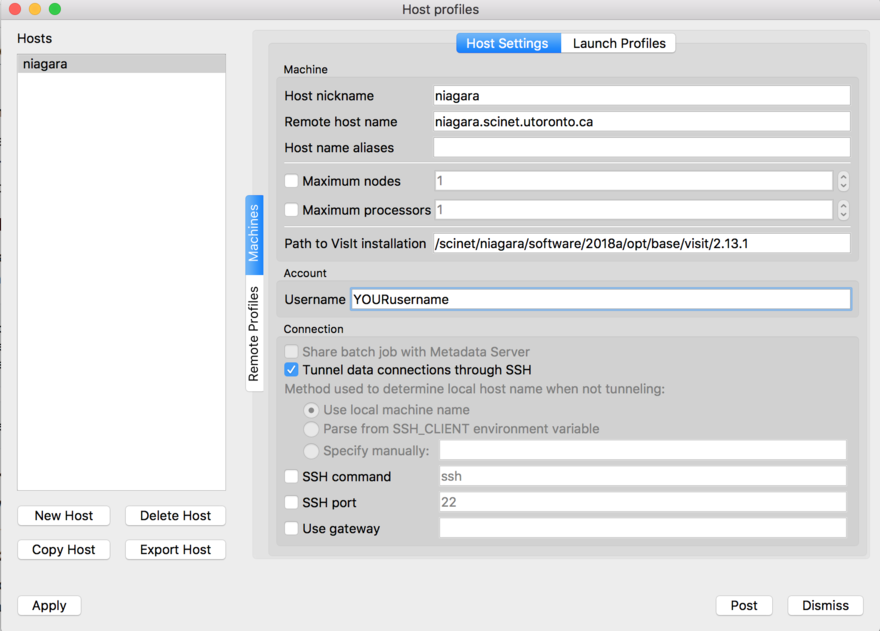
Open VisIt in your computer, go to the Options menu, and click on Host Profiles. Then click on New Host and select:
Host nickname = niagara
Remote host name = niagara.scinet.utoronto.ca
Username = Enter_Your_OWN_username_HERE
Path to VisIt installation = /scinet/niagara/software/2018a/opt/base/visit/2.13.1
Check Tunnel data connections through SSH and click on Apply.
|
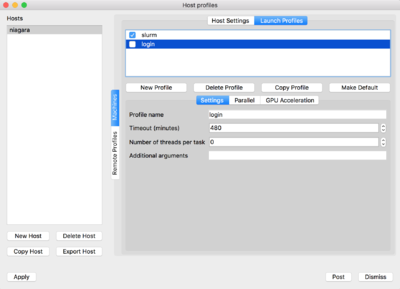
At the top of the window, click on the Launch Profiles tab to create a profile:
loginto connect through a login node and access data;slurmto using compute nodes as rendering engines.
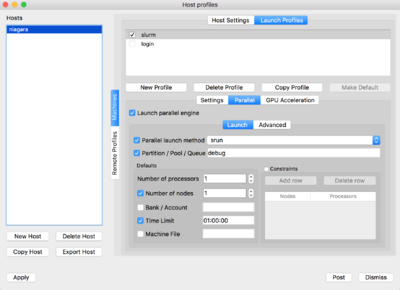
For doing so, click on 'New Profile', set the corresponding profile name, ie. login/slurm. Then click on the Parallel tab and set the "Launch parallel engine". For the slurm profile, you will need to set the parameters as seen below:
|
|
Finally, after you are done with these changes, go to the Options menu and select Save settings, so that your changes are saved and available next time you launch VisIt.
Prerequisites[edit]
You can launch a new cloud virtual machine (VM) as described in the Cloud Quick Start Guide. Once you log into the VM, you will need to install some additional packages to be able to compile ParaView or VisIt. For example, on a CentOS VM you can type:
 sudo yum install xauth wget gcc gcc-c++ ncurses-devel python-devel libxcb-devel
 sudo yum install patch imake libxml2-python mesa-libGL mesa-libGL-devel
 sudo yum install mesa-libGLU mesa-libGLU-devel bzip2 bzip2-libs libXt-devel zlib-devel flex byacc
 sudo ln -s /usr/include/GL/glx.h /usr/local/include/GL/glx.h
If you have your own private-public SSH key pair (as opposed to the cloud key), you may want to copy the public key to the VM to simplify logins, by issuing the following command on your laptop:
cat ~/.ssh/id_rsa.pub | ssh -i ~/.ssh/cloudwestkey.pem centos@vm.ip.address 'cat >>.ssh/authorized_keys'
Compiling VisIt with OSMesa[edit]
VisIt with offscreen rendering support can be built with a single script:
wget http://portal.nersc.gov/project/visit/releases/2.12.1/build_visit2_12_1
chmod u+x build_visit2_12_1
./build_visit2_12_1 --prefix /home/centos/visit --mesa --system-python \
   --hdf4 --hdf5 --netcdf --silo --szip --xdmf --zlib
This may take a couple of hours. Once finished, you can test the installation with:
~/visit/bin/visit -cli -nowin
This should start a VisIt Python shell.
Running VisIt in client-server mode[edit]
Start VisIt on your laptop. In Options -> Host profiles, edit the connection nickname (let's call it Cloud West), the VM host name, the path to the VisIt installation (/home/centos/visit) and your username on the VM; also enable tunneling through SSH. Don't forget to save your settings with Options -> Save Settings. TWhen you open a gile (File -> Open file -> Host = Arbutus) you should see the VM's filesystem. Load a file and try to visualize it. Data processing and rendering should be done on the VM, while the result and the GUI controls will be displayed on your laptop.
