Accessing object storage with WinSCP: Difference between revisions
(migrating content from Arbutus object storage clients page) |
(Marked this version for translation) |
||
| (One intermediate revision by one other user not shown) | |||
| Line 1: | Line 1: | ||
== Installing WinSCP == | <languages /> | ||
<translate> | |||
<!--T:1--> | |||
This page contains instructions on how to set up and access [[Arbutus object storage]] with WinSCP, one of the [[Arbutus_object_storage_clients | object storage clients ]] available for this storage type. | |||
== Installing WinSCP == <!--T:2--> | |||
WinSCP can be installed from https://winscp.net/. | WinSCP can be installed from https://winscp.net/. | ||
== Configuring WinSCP == | == Configuring WinSCP == <!--T:3--> | ||
Under "New Session", make the following configurations: | Under "New Session", make the following configurations: | ||
<ul> | <ul> | ||
| Line 12: | Line 18: | ||
and "Save" these settings as shown below | and "Save" these settings as shown below | ||
<!--T:4--> | |||
[[File:WinSCP Configuration.png|600px|thumb|center|WinSCP configuration screen]] | [[File:WinSCP Configuration.png|600px|thumb|center|WinSCP configuration screen]] | ||
<!--T:5--> | |||
Next, click on the "Edit" button and then click on "Advanced..." and navigate to "Environment" to "S3" to "Protocol options" to "URL style:" which <b>must</b> changed from "Virtual Host" to "Path" as shown below: | Next, click on the "Edit" button and then click on "Advanced..." and navigate to "Environment" to "S3" to "Protocol options" to "URL style:" which <b>must</b> changed from "Virtual Host" to "Path" as shown below: | ||
<!--T:6--> | |||
[[File:WinSCP Path Configuration.png|600px|thumb|center|WinSCP Path Configuration]] | [[File:WinSCP Path Configuration.png|600px|thumb|center|WinSCP Path Configuration]] | ||
<!--T:7--> | |||
This "Path" setting is important, otherwise WinSCP will not work and you will see hostname resolution errors, like this: | This "Path" setting is important, otherwise WinSCP will not work and you will see hostname resolution errors, like this: | ||
[[File:WinSCP resolve error.png|400px|thumb|center|WinSCP resolve error]] | [[File:WinSCP resolve error.png|400px|thumb|center|WinSCP resolve error]] | ||
== Using WinSCP == | == Using WinSCP == <!--T:8--> | ||
Click on the "Login" button and use the WinSCP GUI to create buckets and to transfer files: | Click on the "Login" button and use the WinSCP GUI to create buckets and to transfer files: | ||
<!--T:9--> | |||
[[File:WinSCP transfers.png|800px|thumb|center|WinSCP file transfer screen]] | [[File:WinSCP transfers.png|800px|thumb|center|WinSCP file transfer screen]] | ||
== Access Control Lists (ACLs) and Policies == | == Access Control Lists (ACLs) and Policies == <!--T:10--> | ||
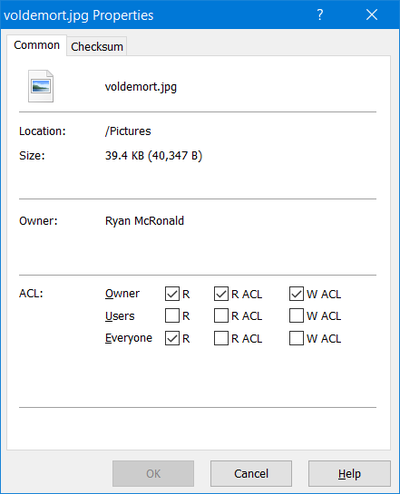
Right-clicking on a file will allow you to set a file's ACL, like this: | Right-clicking on a file will allow you to set a file's ACL, like this: | ||
[[File:WinSCP ACL.png|400px|thumb|center|WinSCP ACL screen]] | [[File:WinSCP ACL.png|400px|thumb|center|WinSCP ACL screen]] | ||
<!--T:11--> | |||
[[Category:Cloud]] | |||
</translate> | |||
Latest revision as of 21:21, 13 March 2023
This page contains instructions on how to set up and access Arbutus object storage with WinSCP, one of the object storage clients available for this storage type.
Installing WinSCP
WinSCP can be installed from https://winscp.net/.
Configuring WinSCP
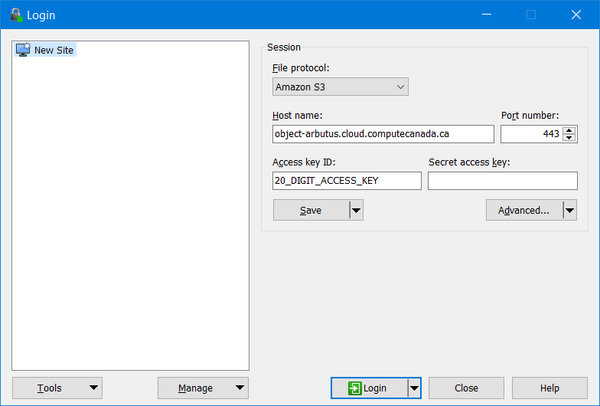
Under "New Session", make the following configurations:
- File protocol: Amazon S3
- Host name: object-arbutus.cloud.computecanada.ca
- Port number: 443
- Access key ID: 20_DIGIT_ACCESS_KEY
and "Save" these settings as shown below
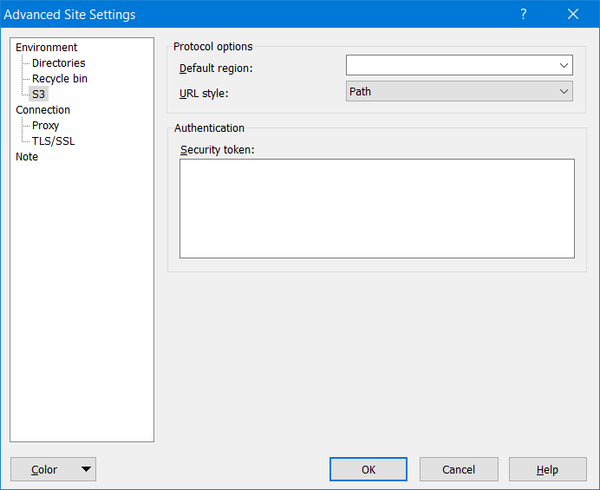
Next, click on the "Edit" button and then click on "Advanced..." and navigate to "Environment" to "S3" to "Protocol options" to "URL style:" which must changed from "Virtual Host" to "Path" as shown below:
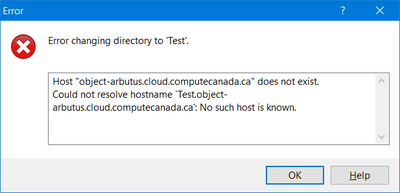
This "Path" setting is important, otherwise WinSCP will not work and you will see hostname resolution errors, like this:
Using WinSCP
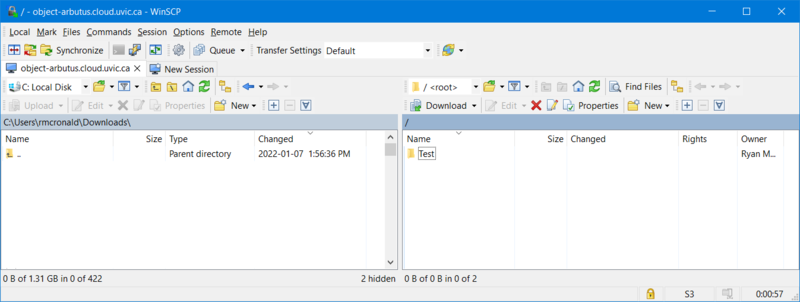
Click on the "Login" button and use the WinSCP GUI to create buckets and to transfer files:
Access Control Lists (ACLs) and Policies
Right-clicking on a file will allow you to set a file's ACL, like this:
