Connecting with PuTTY: Difference between revisions
(Created page with "400px|thumb| (Click for larger image) 400px|thumb| (Click for larger image) File:Putty_X11_forwarding.png|400px|thumb|...") |
No edit summary |
||
| (25 intermediate revisions by 6 users not shown) | |||
| Line 1: | Line 1: | ||
<languages /> | |||
<translate> | |||
<!--T:1--> | |||
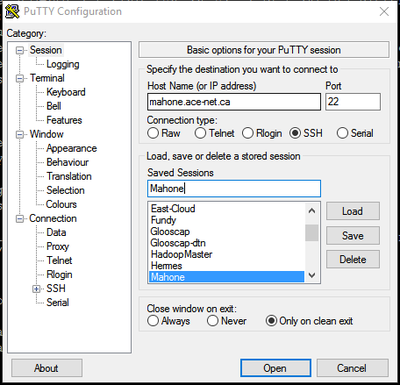
[[File:Putty_basic.png|400px|thumb| Enter hostname or IP address (Click for larger image)]] | |||
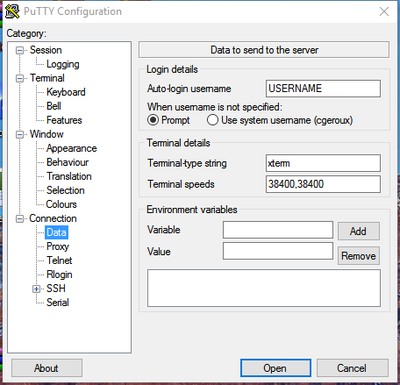
[[File:Putty_username.png|400px|thumb| Specify username to use when connecting; this is optional as one can type it when connecting (Click for larger image)]] | |||
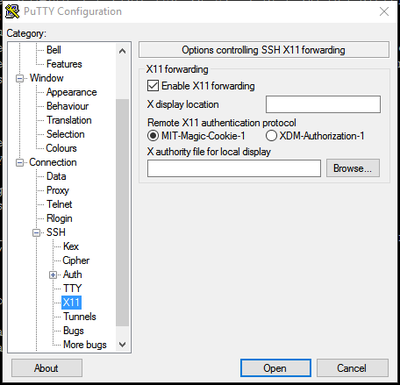
[[File:Putty_X11_forwarding.png|400px|thumb| Enable X11 forwarding (Click for larger image)]] | |||
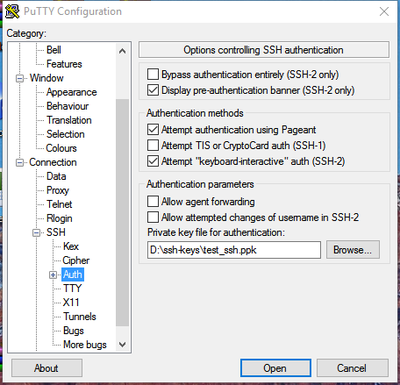
[[File:Putty_ssh_key.png|400px|thumb| Specifying an SSH key (Click for larger image)]] | |||
<!--T:2--> | |||
Start up [http://www.chiark.greenend.org.uk/~sgtatham/putty/ PuTTY] and enter the host name or IP address of the machine you wish to connect to. You may also save a collection of settings by entering a session name in the <i>Save Sessions</i> text box and clicking the <i>Save</i> button. You can set the username to use when logging into a particular host under the <i>Connection->Data</i> section in the <i>Auto-login username</i> text box to saving typing the username when connecting. | |||
=X11 forwarding= <!--T:3--> | |||
If working with graphical-based programs, X11 forwarding should be enabled. To do this, go to <i>Connection->SSH->X11</i> and check the <i>Enable X11 forwarding</i> checkbox. To use X11 forwarding one must install an X window server such as [http://www.straightrunning.com/xmingnotes/ Xming] or, for the recent versions of Windows, [https://sourceforge.net/projects/vcxsrv/ VcXsrv]. The X window server should be actually started prior to connecting with SSH. Test that X11 forwarding is working by opening a PuTTY session and running a simple GUI-based program, such as typing the command <code>xclock</code>. If you see a popup window with a clock, X11 forwarding should be working. | |||
=Using a key pair= <!--T:4--> | |||
To set the private key putty uses when connecting to a machine go to Connection->SSH->Auth and clicking the <i>Browse</i> button to find the private key file to use. Putty uses files with a <i>.ppk</i> suffix, which are generated using PuTTYGen (see [[Generating SSH keys in Windows|Generating SSH keys in Windows]] for instructions on how to create such a key). In newer versions of Putty, you need to click the "+" sign next to <i>Auth</i> and then select <i>Credentials</i> to be able to browse for the <i>Private key file for authentication</i>. Note that the additional fields in that newer interface, i.e. <i>Certificate to use</i> and <i>Plugin to provide authentication response</i>, should be left blank. | |||
[[Category:Connecting]] | |||
</translate> | |||
Latest revision as of 18:41, 24 April 2023
Start up PuTTY and enter the host name or IP address of the machine you wish to connect to. You may also save a collection of settings by entering a session name in the Save Sessions text box and clicking the Save button. You can set the username to use when logging into a particular host under the Connection->Data section in the Auto-login username text box to saving typing the username when connecting.
X11 forwarding
If working with graphical-based programs, X11 forwarding should be enabled. To do this, go to Connection->SSH->X11 and check the Enable X11 forwarding checkbox. To use X11 forwarding one must install an X window server such as Xming or, for the recent versions of Windows, VcXsrv. The X window server should be actually started prior to connecting with SSH. Test that X11 forwarding is working by opening a PuTTY session and running a simple GUI-based program, such as typing the command xclock. If you see a popup window with a clock, X11 forwarding should be working.
Using a key pair
To set the private key putty uses when connecting to a machine go to Connection->SSH->Auth and clicking the Browse button to find the private key file to use. Putty uses files with a .ppk suffix, which are generated using PuTTYGen (see Generating SSH keys in Windows for instructions on how to create such a key). In newer versions of Putty, you need to click the "+" sign next to Auth and then select Credentials to be able to browse for the Private key file for authentication. Note that the additional fields in that newer interface, i.e. Certificate to use and Plugin to provide authentication response, should be left blank.


