Cloud Quick Start/fr: Difference between revisions
No edit summary |
(Created page with "=Créer votre première machine virtuelle= ==Se connecter sur East ou West cloud== File:OpenStack-Dashboard-Compute-Overview.png|400px|thumb| OpenStack Dashboard, vue d'ense...") |
||
| Line 4: | Line 4: | ||
Puis vous devez avoir un compte avec Westgrid, vous pouvez en faire la demande à partir de [https://ccdb.computecanada.ca/ https://ccdb.computecanada.ca/]. Une fois connecté, sous l'onglet "Mon compte", allez dans "Demander un compte à un consortium" et demandez un compte à Westgrid. Une fois que vous avez reçu votre confirmation, vous pouvez faire une demande pour un compte du nuage au [https://www.computecanada.ca/create-a-cloud-account/ https://www.computecanada.ca/create-a-cloud-account/].(page française?) | Puis vous devez avoir un compte avec Westgrid, vous pouvez en faire la demande à partir de [https://ccdb.computecanada.ca/ https://ccdb.computecanada.ca/]. Une fois connecté, sous l'onglet "Mon compte", allez dans "Demander un compte à un consortium" et demandez un compte à Westgrid. Une fois que vous avez reçu votre confirmation, vous pouvez faire une demande pour un compte du nuage au [https://www.computecanada.ca/create-a-cloud-account/ https://www.computecanada.ca/create-a-cloud-account/].(page française?) | ||
= | =Créer votre première machine virtuelle= | ||
== | ==Se connecter sur East ou West cloud== | ||
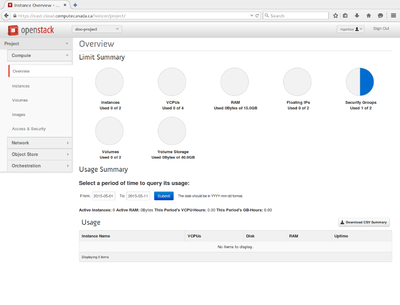
[[File:OpenStack-Dashboard-Compute-Overview.png|400px|thumb| OpenStack Dashboard, | [[File:OpenStack-Dashboard-Compute-Overview.png|400px|thumb| OpenStack Dashboard, vue d'ensemble de votre compte]] | ||
Les pages de connexion aux nuages sont [https://east.cloud.computecanada.ca https://east.cloud.computecanada.ca] et [https://west.cloud.computecanada.ca https://west.cloud.computecanada.ca]. | |||
Vous pouvez vous connecter avec votre nom d'utilisateur et mot de passe de Westgrid. Une fois connecté, vous serez dans le tableau de bord d'Openstack (Dashboard). | |||
Vous aurez une vue d'ensemble des ressources à votre disposition sur le cloud. | |||
==SSH Key Pair== | ==SSH Key Pair== | ||
Revision as of 14:26, 23 March 2016
Obtenir un compte
Vous devez premièrement obtenir un compte Calcul Canada, vous pouvez faire la demande à https://www.computecanada.ca/page-daccueil-du-portail-de-recherche/account-management/demander-un-compte/?lang=fr. Puis vous devez avoir un compte avec Westgrid, vous pouvez en faire la demande à partir de https://ccdb.computecanada.ca/. Une fois connecté, sous l'onglet "Mon compte", allez dans "Demander un compte à un consortium" et demandez un compte à Westgrid. Une fois que vous avez reçu votre confirmation, vous pouvez faire une demande pour un compte du nuage au https://www.computecanada.ca/create-a-cloud-account/.(page française?)
Créer votre première machine virtuelle
Se connecter sur East ou West cloud
Les pages de connexion aux nuages sont https://east.cloud.computecanada.ca et https://west.cloud.computecanada.ca. Vous pouvez vous connecter avec votre nom d'utilisateur et mot de passe de Westgrid. Une fois connecté, vous serez dans le tableau de bord d'Openstack (Dashboard). Vous aurez une vue d'ensemble des ressources à votre disposition sur le cloud.
SSH Key Pair
When you start a virtual machine (or "instance") there is no password for admin or root account on the VM, and no one can log in to it using a password. We do this for security reasons: You would not want a hacker to be able to access the brand new VM you just started using some default password. Therefore OpenStack will create your VM with one SSH public key installed, and you can only log in to it with that SSH key pair. You can either import an existing SSH key pair through OpenStack, or you can create a new pair. In order to manage your key pair, click on “Access & Security” from the left menu, then on the “Key Pairs” tab.
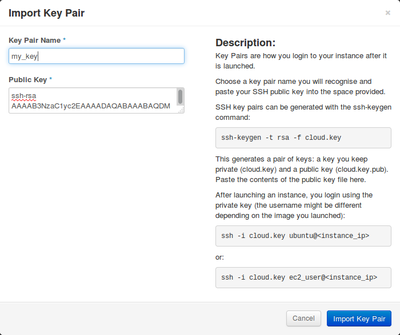
Importer une clé ssh
- Peser sur

- Nommer votre clé.
- Coller le contenue de votre clé publique.
- Confirmer en pesant sur "Import Key Pair" en bleu.
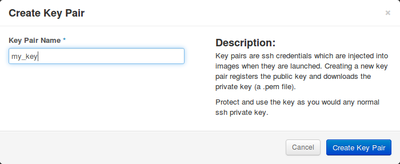
Créer une paire de clé
Sur un système Unix, vous devrez changer la permission de la clé avant de l'utilisé, chmod 400 <clé>.pem. Ceci dois être fait sur la machine qui se connecte au cloud. Avec Windows, pour utiliser la clé obtenue, vous devrez la convertir dans le format Windows. Cette étape est expliqué à la page Generating ssh keys in Windows#Converting an OpenStack Key.
Démarrer une machine virtuelle
Pour démarrer une VM, allez dans le menu "Instance" et cliquez sur ![]() .
.
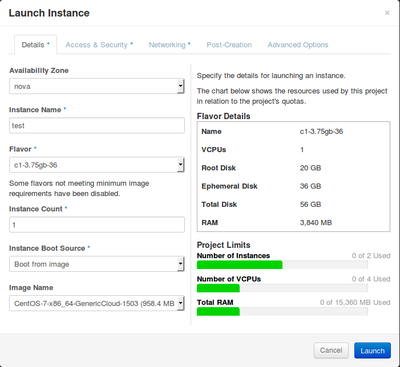
Vous êtes maintenant dans le formulaire de création de la machine virtuelle.
- Dans "Details"
- "Zone de disponibilité": Il n'y a que la zone "nova" de disponible.
- "Nom de l'Instance": Nom de votre machine.
- "Type d'instance": Définie le type de machine.
Le code ce lit Processeurs-RAM-Memoire
donc
c1-3.75gb-36
signifie: 1 processeur avec 3.758 Gb de Ram et un disque éphémère de 36 Gb. Le disque éphémère est de la mémoire qui est créer et détruite avec votre avec la machine. Les configurations de type "c" possèdent aussi 20Gb de mémoire dans "root" en plus de la mémoire éphémère. Les type d'instances commençant avec "p" ne possèdent pas de mémoire éphémère et un petit "root".
- Nombre d'Instances: Nombre de machine virtuelle à lancer.
- Source de démarrage de l'instance: Vous pouvez lancer votre instance à partir d'un image de système d'exploitation en choisissant "Démarrage depuis une image". Les options "Démarrage depuis un instantané" ou "volume" permettent de relancer un instance [utilisation avancé].
- Nom de l'Image: Nom de l'image du OS à utiliser. Centos :
CentOS-7-x86-64-GenericCloud-1503
est un bon choix de base.
- Limites du Projet: Les barres indiquent l'utilisation de vos ressources. La partie bleu indique la partie déjà utilisé. Les barres verte indique les ressources demander par votre nouvelle instance. Si les ressources sont insuffisantes,les barres deviendrons rouge.
- Accès et sécurité
- Paire de clés: Sélectionnez votre clé SSH.
- Groupes de sécurité: Choix des règles de sécurité. Les règles
defaultsont fournie par calculcanada.
- Réseaux
Choix du réseau. Un réseau prédéfini est fournie. - Post-Création Tab
Vous pouvez insérer un script pour une configuration avancé. Peut être vide. Pour de l'information pour créer plusieurs utilisateurs avec votre instance, voir OpenStack#Accessing a VM with Multiple Users. Pour de la documentation sur l'utilisation de script cloud-init, voir cloudinit. - Options avancées
Choix de la méthode de partition du disque. Choisir "Automatique"
Once you have reviewed all the tabs and defined your instance, click on the blue Launch button and your instance will be created. The Instances list will appear, and the Status field will change, reflecting the different tasks that have to happen until it is running. It may take a few minutes for your instance to start, depending on a variety of factors.
Note: When creating a persistent service, we recommend that you boot your instance from a volume. See Persistent Services In The Cloud.
Network
Private IP
On the Instance list, you will see the IP addresses to which your instance is linked. By default a network on 192.168.X.0 is created for your tenant (also referred to as a "project" on the OpenStack dashboard). You can see the private IP your instance has on the Instance list screen. You can use this IP to communicate with other instances you have started on the same cloud.
Public IP (Assign a public IP)
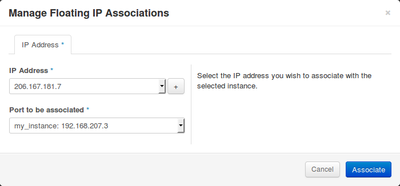
To assign a public IP, you need to select “Associate Floating IP” from the More button of the Actions column of the Instances list. If this is your first time through this Quick Start Guide, your tenant hasn't been assigned any external IP addresses yet. You need to click on the “+” sign to bring up the "Allocate Floating IP" dialogue box. There is only one pool of public addresses, so the correct Pool will already be selected. You simply click on the blue Allocate IP button. You will be returned to the "Manage Floating IP Associations" screen, the IP Address field should be populated, and the port to which it should be NATted should already be selected. Simply click on the blue Associate button.
Firewall, Add Rules to Allow SSH
In order to be able to connect to your instance via SSH, you will need to allow SSH to get through.
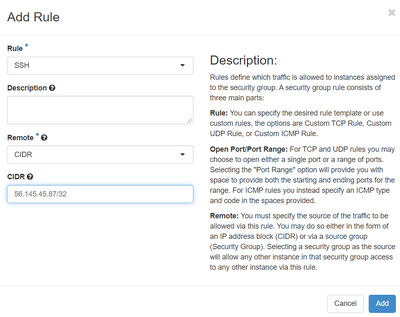
Go to “Access & Security”, in the “Security Groups” tab, then on the default row click ![]()
For SSH, there are already predefined rules. Simply select SSH in the Rules drop down menu, then under Remote, keep CIDR.
If you know which address you are connecting from, type it in the CIDR text field; otherwise keep 0.0.0.0/0. This will allow the whole world to connect to your server via SSH.
Finally, click the blue Add button.
Connecting To Your Instance With SSH.
If you created a key pair on the first step, you will need to know where it is.
If connecting from a Linux machine:
[name@server ~]$ ssh -i /path/where/your/key/is/my_key.key username@<public IP of your server>
Most common Linux distributions have standardized on the name of the distro as the username. To connect to the provided CentOS images, you would use:
[name@server ~]$ ssh -i /path/where/your/key/is/my_key.key centos@<public IP of your server>
where <public IP of your server> is the public IP you set in the previous step (Cloud Quick Start#Public IP (Assign a public IP)). The username for Ubuntu instances is “ubuntu” and Debian instances have the “debian” username. By default the preconfigured cloud username will have full sudo privileges. The root account is normally disabled.
You are now connected to your instance.
If connecting from a windows machine
see Connecting with PuTTY or Connecting with MobaXTerm
Where To Go From Here
- Cloud-init: https://cloudinit.readthedocs.org/en/latest/
- Openstack upstream documentation: http://docs.openstack.org/icehouse/
- CLI control: http://docs.openstack.org/developer/python-openstackclient/
- WestGrid documentation: https://www.westgrid.ca/support/quickstart/CC-Cloud
