Globus
Globus is a service for fast, reliable, secure data movement. Designed specifically for researchers, Globus has an easy-to-use interface with background monitoring features that automate the management of file transfers between any two resources, whether they are at Compute Canada, another supercomputing facility, a campus cluster, lab server, desktop or laptop.
Globus leverages GridFTP for its transfer protocol but shields the end user from complex and time consuming tasks related to GridFTP and other aspects of data movement. It improves transfer performance over GridFTP, rsync, scp, and sftp, by automatically tuning transfer settings, restarting interrupted transfers, and checking file integrity.
Globus can be accessed via the main Globus website or via the Compute Canada Globus portal at https://globus.computecanada.ca.
Using Globus[edit]
Go to http://globus.computecanada.ca. Your "existing organizational login" is your CCDB account. Ensure that "Compute Canada" is selected in the drop-down, then click Continue. Supply your CCDB username and password on the Compute Canada MyProxy page which appears. This takes you to the web portal for Globus.
To Start a Transfer[edit]
Globus transfers happen between so-called "Endpoints." Most Compute Canada systems have endpoints already. To transfer files to and from your computer, you need to create an endpoint for it. This requires a bit of setup initially, but once it has been done, Globus transfers require little more than making sure the endpoint application is running on your machine. More on this below under Personal Computers.
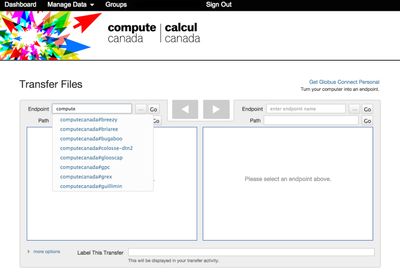
If the "Transfer Files" page in the Globus Portal is not already showing (see image), select it from the "Manage Data" menu.
Click on either one of the two "Endpoint" fields, and start typing the site name in the top box. For example, if you want to transfer data to or from the GPC cluster, type "gpc", wait two seconds for a list of matching sites to appear, and select computecanada#gpc.
All Compute Canada resources have names prefixed with computecanada#.
You will be prompted to "authenticate" the endpoint. The appearance of this depends on which site is hosting the endpoint. For example, if you are activating the endpoint for Silo, which is in WestGrid, you will be asked for your WestGrid username and password. The authentication of an endpoint remains valid for some time - currently (Apr 25, 2016) for one week for CC endpoints while personal endpoints do not expire. If you encounter difficulty at the authentication stage, see if there is regional documentation which applies to your situation:
Now select a second endpoint and authenticate it the same way.
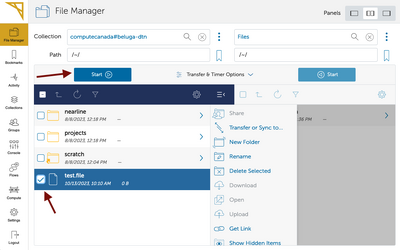
Once an endpoint has been activated you should see a list of directories and files. You can navigate these by double-clicking on directories and using the "up one folder" button. Highlight a file or directory that you want to transfer by single-clicking on it. Control-click to highlight multiple things. Then click one of the big blue buttons with white arrowheads to initiate the transfer. The transfer job will be given a unique number and will begin right away. You will receive an email when the transfer is complete. You can also monitor in-progress transfers and view details of completed transfers from the Activity tab on the Globus Portal.
See also How To Log In and Transfer Files with Globus at the Globus.org site.
Options[edit]
Globus provides several other options in the "Transfer Settings" area at the bottom of the Transfer Files page. Here you can direct Globus to
- sync - only transfer new or changed files
- delete files on destination that do not exist on source
- preserve source file modification times
- verify file integrity after transfer (on by default)
- encrypt transfer
Note that enabling encryption significantly reduces transfer performance, so it should only be used for sensitive data.
Personal Computers[edit]
Globus provides a desktop client, Globus Connect Personal, to make it easy to transfer files to and from a personal computer running Windows, MacOS X, or Linux.
To install Globus Connect Personal:
- Go to the Compute Canada Globus portal and log in if you have not already done so.
- From the Manage Data menu, select Endpoints, and then click on “add Globus Connect Personal endpoint”.
- Enter an endpoint name of your choice, which you will use to access the computer you will be installing Globus Connect Personal on. Example: MacLaptop or WorkPC.
- Click the “Generate Setup Key” button. Copy the key to your computer’s clipboard, then click the download link for your operating system.
- Install the program.
- Once it is installed, run the Globus Connect Personal program.
- The first time you run the program, enter the Setup Key from step 4 in the box that pops up.
- You should now be able to access the endpoint through Globus. The full endpoint name is [your username]#[name from step 3] Example: smith#WorkPC
To run Globus Connect Personal:
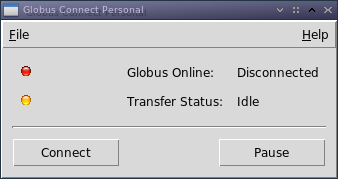
The above steps are only needed once, to setup the endpoint. For further file transfer operations, one has to make sure Globus Connect Personal is running, i.e., start the program and click "Connect."
Note that if the Globus Connect Personal program at your end point is closed during a file transfer to or from that endpoint, the transfer will stop. To restart the transfer, simply reopen the program and click "Connect".
Transfer between two personal endpoints:
Although you can create endpoints for any number of personal computers, transfers between two personal endpoints is not enabled by default. If you need this capability, please contact globus@computecanada.ca to setup a "Globus Plus" account.
For more information see the Globus.org how-to pages, particularly:
- Globus Connect Personal for Mac OS X
- Globus Connect Personal for Windows
- Globus Connect Personal for Linux
Support[edit]
For questions and further support regarding Globus, please contact globus@computecanada.ca.
Further Reading[edit]
Globus sharing makes collaboration with your colleagues easy. Sharing enables people to access files stored on your account on a Compute Canada system even if the other user does not have an account on that system. Files can be shared with any user, anywhere in the world, who has a Globus account. See How To Share Data Using Globus.
Globus groups provide an easy way to manage permissions for sharing with multiple users. When you create a group, you can use it from the sharing interface easily to control access for multiple users. See How to Manage Globus Groups.
Support and More Information[edit]
If you would like more information on Compute Canada’s use of Globus, or require support in using this service, please send an email to globus@computecanada.ca and provide the following information:
- Name
- Compute Canada Role Identifier (CCRI)
- Institution
- Inquiry or issue. Be sure to indicate which sites you want to transfer to and from.


