Travailler avec des volumes
A volume provides storage which is not destroyed when a VM is terminated. On our clouds, volumes use Ceph storage with either a 3-fold replication factor or erasure codes to provide safety against hardware failure. On Arbutus the Default volume type uses erasure codes to provide data safety while reducing the extra storage costs of 3-fold replication while the OS or Database volume type still uses the 3-fold replication factor. More documentation about OpenStack volumes can be found here
Création d'un volume
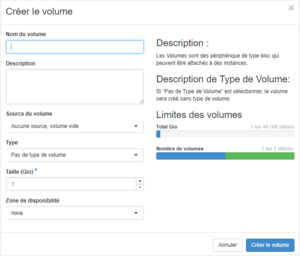
Cliquez sur le bouton + Créer un volume et remplissez les champs comme suit :
- Nom du volume : par exemple,
data - Description : texte libre
- Source du volume :
Aucune source, volume vide - Type :
Pas de type de volume - Taille (Gio) :
40ou toute autre valeur appropriée pour vos données ou votre système d'exploitation - Zone de disponibilité :
novaest la seule option disponible pour les nuages East et Arbutus
Cliquez sur le bouton Créer un volume.
Mounting a volume on a VM
Attaching a Volume
- Attaching is the process of associating a volume with a VM. This is analogous to inserting a USB key or plugging an external drive into your personal computer.
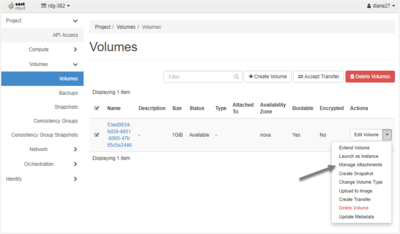
- You can attach a volume from the Volumes page in the Dashboard.
- At the right-hand end of the line describing the volume is the Actions column; from the drop-down menu, select "Manage Attachments."
- In the "Attach To Instance" drop-down menu, select a VM.
- Click the blue "Attach Volume" button.
Attaching should complete in a few seconds. Then the Volumes page will show the newly created volume attached to your selected VM on /dev/vdb or some similar location.
Formatting a newly created Volume
- Formatting is the process of preparing a volume to store directories and files.
- Before a newly created and attached volume can be used, it must be formatted.
- Formatting erases all existing information on a volume and therefore should be done with care.
- See instructions for doing this on a Linux or Windows VM.
Mounting a Volume
- Mounting is the process of mapping the volume's directory and file structure logically within the VM's directory and file structure.
- To mount the volume, use a command similar to
[name@server ~]$ sudo mount /dev/vdb1 /mntdepending on the device name, disk layout, and the desired mount point in your filesystem.
This command makes the volume's directory and file structure available under the VM's /mnt directory.
Démarrer depuis un volume
Pour créer un service persistant, il est recommandé de démarrer l'instance depuis un volume. Une instance démarrée depuis une image plutôt que d'un volume est stockée sur le disque local de la machine qui opère cette même instance. L'instance pourrait être perdue si un problème survient sur la machine ou son disque. Le stockage du volume procure une redondance qui protège l'instance de défaillance du matériel. De façon générale, les gabarits pour démarrer depuis un volume commencent par la lettre p (voir la page Gabarits d'instances).
Démarrer une instance depuis un volume peut se faire
- à partir d'une image en créant un nouveau volume;
- à partir d'un volume existant;
- à partir d'un instantané (snapshot), en créant un nouveau volume.
Si vous faites ceci pour la première fois, utilisez la première option; les deux autres options ne sont possibles que si vous avez déjà créé un volume ou un instantané de volume.
If creating a volume as part of the process of launching the VM, select Boot from image (creates a new volume), select the image to use, and the size of the volume. If this volume is something you would like to remain longer than the VM ensure that the "Delete on Terminate" box is unchecked. If you are unsure about this option, it is better to leave this box unchecked. You can manually delete the volume later.
Creating an image from a volume
Creating an image from a volume allows you to download the image. Do this if you want to save it as a backup, or to spin up a VM somewhere other than the CC Cloud, e.g. with VirtualBox. If you want to copy a volume to a new volume within the same cloud see cloning a volume instead. To create an image of a volume, it must first be detached from a VM. If it is a boot volume, it can only be detached from a VM if the VM is terminated/deleted.
Par le tableau de bord
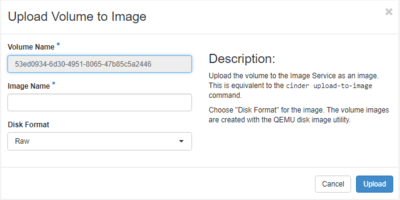
- Sous Projet->Volumes, sélectionnez le volume.
- Dans la colonne Actions, sélectionnez Charger dans l'image du menu déroulant.
- Entrez un nom pour la nouvelle image.
- Sélectionnez le Format du disque. QCOW2 est recommandé pour le nuage OpenStack parce que ce format est relativement plus compact que Raw et plus efficace avec OpenStack. Si vous voulez utiliser l'image avec Virtualbox sélectionnez de préférence vmdk ou vdi.
- Cliquez sur le bouton Charger.
Using the Command Line Clients
The command line client can do this:
[name@server ~]$ openstack image create --disk-format <format> --volume <volume_name> <image_name>
where
- <format> is the disk format (two possible values are qcow2 and vmdk),
- <volume_name> can be found from the OpenStack dashboard by clicking on the volume name, and
- <image_name> is a name you choose for the image.
You can then download the image as described below. It is best to detach the volume from the VM before you create an image from the volume. If the volume is a boot volume you will likely need to delete your VM to detach it, however, make sure you have not checked "Delete Volume on Instance Delete" when creating the VM.
Cloning a volume
Cloning is the recommended method for copying volumes. While it is possible to make an image of an existing volume and use it to create a new volume, cloning is much faster and requires less movement of data behind the scenes. This method is handy if you have a persistent VM and you want to test out something before doing it on your production site. It is highly recommended to shut down your VM before creating a clone of the volume as the newly created volume may be left in an inconsistent state if there was writing to the source volume during the time the clone was created. To create a clone you must use the command line client with this command
[name@server ~]$ openstack volume create --source <source-volume-id> --size <size-of-new-volume> <name-of-new-volume>
Détacher un volume
Avant de détacher un volume, il est important de vérifier si des fichiers de ce volume sont utilisés par le système d'exploitation ou des applications actives dans votre instance; si c'est le cas, le volume détaché pourrait être corrompu ou les applications pourraient avoir des comportements inattendus. Il est donc recommandé de fermer l'instance ou de démonter le volume.
To detach a volume, log in to the OpenStack dashboard (see the list of links) and select the project containing the volume you wish to detach. Selecting Volumes -> Volumes displays the project’s volumes. For each volume, the Attached to column indicates where the volume is attached.
- Si la colonne indique
/dev/vda, il s'agit d'un volume de démarrage; vous devez détacher l'instance avant de détacher le volume, autrement le message d'erreur Impossible de déconnecter le volume sera affiché.
- Si la colonne indique
/dev/vdb,/dev/vdc, etc., il n'est pas nécessaire de détacher l'instance. Dans la liste déroulante sous Actions, sélectionnez Gérer les attachements, cliquez sur le bouton Détacher le volume puis sur l'autre bouton Détacher le volume pour confirmer.


