Generating SSH keys in Windows: Difference between revisions
No edit summary |
No edit summary |
||
| Line 18: | Line 18: | ||
# Click the "Save private key" button and choose a meaningful file name (e.g. compute_canada.ppk). | # Click the "Save private key" button and choose a meaningful file name (e.g. compute_canada.ppk). | ||
= | =Intalling the public part of the key pair= <!--T:6--> | ||
==Installing via CCDB== | |||
<!--T:10--> | <!--T:10--> | ||
| Line 24: | Line 25: | ||
<!--T:11--> | <!--T:11--> | ||
==Installing locally== | |||
This method below is still available, but we encourage all users to [[Generating_SSH_keys_in_Windows#Installing via CCDB|install it via CCDB]]. | |||
If for some reasons you still want to upload the public key locally on a specific cluster, the steps are described below: | |||
# Add the public key from the text box under "Public key for pasting into OpenSSH authorized_keys", by copying and pasting it, as a single line to the end of the <code>/home/USERNAME/.ssh/authorized_keys</code> on the server you wish to connect to as the user <code>USERNAME</code> with WinSCP or an editor launched from that server such as vim or nano. | # Add the public key from the text box under "Public key for pasting into OpenSSH authorized_keys", by copying and pasting it, as a single line to the end of the <code>/home/USERNAME/.ssh/authorized_keys</code> on the server you wish to connect to as the user <code>USERNAME</code> with WinSCP or an editor launched from that server such as vim or nano. | ||
# Ensure directory, file permissions are correct and have the correct owner as described in steps 2 and 3 of [[Using SSH keys in Linux#Connecting using a Key Pair|these instructions]]. | # Ensure directory, file permissions are correct and have the correct owner as described in steps 2 and 3 of [[Using SSH keys in Linux#Connecting using a Key Pair|these instructions]]. | ||
<!--T:4--> | <!--T:4--> | ||
Key generation and usage is demonstrated in this youtube video with PuTTY: [https://www.youtube.com/watch?v=2nkAQ9M6ZF8 Easily setup PuTTY SSH keys for passwordless logins using Pageant]. | Key generation and usage is demonstrated in this youtube video with PuTTY: [https://www.youtube.com/watch?v=2nkAQ9M6ZF8 Easily setup PuTTY SSH keys for passwordless logins using Pageant]. | ||
=Connecting using a key pair= <!--T:12--> | |||
Test the new key by connecting to the server as <code>USERNAME</code> using ssh (see [[Connecting with PuTTY#Using a Key Pair| connecting with PuTTY using a key pair]] or [[Connecting with MobaXTerm#Using a Key Pair| connecting with MobaXTerm using a key pair]]). | |||
=Converting an OpenStack key= <!--T:5--> | =Converting an OpenStack key= <!--T:5--> | ||
Revision as of 20:53, 26 October 2021
Parent page: SSH
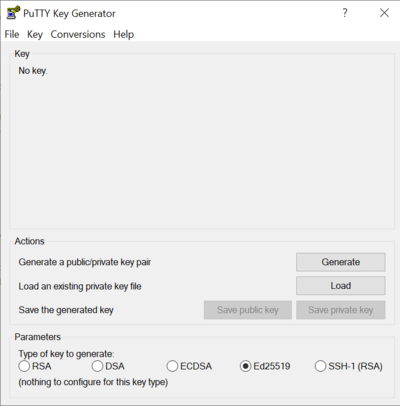
If using PuTTY or MobaXTerm the process of generating a key is nearly the same with only minor differences. In MobaXTerm go to the Tools->MobaKeyGen (SSH key generator), and with PuTTY run the PuTTYGen executable both of these methods will result in displaying a very similar window which can be used to generate or load an existing key.
Generating a key pair[edit]
- Select 'Ed25519' (RSA 2048 bits and above is acceptable too).
- Click the "Generate" button. You will then be asked to move your mouse around to generate random data to be used to create the key.
- Enter a passphrase for your key.
- Click the "Save private key" button and choose a meaningful file name (e.g. compute_canada.ppk).
Intalling the public part of the key pair[edit]
Installing via CCDB[edit]
We encourage all users to leverage the new CCDB feature to upload their SSH public key. Grab the content from the text box under "Public key for pasting into OpenSSH authorized_keys" and upload it to CCDB as per instructions in SSH Keys Installing your key in the section "Using CCDB", STEP 3.
Installing locally[edit]
This method below is still available, but we encourage all users to install it via CCDB. If for some reasons you still want to upload the public key locally on a specific cluster, the steps are described below:
- Add the public key from the text box under "Public key for pasting into OpenSSH authorized_keys", by copying and pasting it, as a single line to the end of the
/home/USERNAME/.ssh/authorized_keyson the server you wish to connect to as the userUSERNAMEwith WinSCP or an editor launched from that server such as vim or nano. - Ensure directory, file permissions are correct and have the correct owner as described in steps 2 and 3 of these instructions.
Key generation and usage is demonstrated in this youtube video with PuTTY: Easily setup PuTTY SSH keys for passwordless logins using Pageant.
Connecting using a key pair[edit]
Test the new key by connecting to the server as USERNAME using ssh (see connecting with PuTTY using a key pair or connecting with MobaXTerm using a key pair).
Converting an OpenStack key[edit]
When a key is created on OpenStack you obtain a key with a ".pem" extension. This key can be converted to a format used by PuTTY by clicking the "Load" button in PuTTYGen. Then select the "All Files (*.*)" filter and select your ".pem" file downloaded from OpenStack and click "Open". You should also add a "Key passphrase" at this point to use when accessing your private key and then click "Save private key".
This private key can be used with PuTTY to connect to a VM that OpenStack injects with the matching public key under the "Key Pairs" tab under the "Access & Security" tab when launching a new VM. You can read more about connecting using PuTTY or MobaXterm.

