Generating SSH keys in Windows: Difference between revisions
(Marked this version for translation) |
No edit summary |
||
| Line 32: | Line 32: | ||
We encourage you to register your SSH public key with the CCDB. This will let you to use it to log in to any Compute Canada HPC cluster. Copy the contents of the box titled "Public key for pasting into OpenSSH ..." and paste it into the box at [https://ccdb.computecanada.ca/ssh_authorized_keys CCDB -> Manage SSH Keys]. For more about this, see [[SSH_Keys#Using_CCDB| SSH Keys: Using CCDB]]. | We encourage you to register your SSH public key with the CCDB. This will let you to use it to log in to any Compute Canada HPC cluster. Copy the contents of the box titled "Public key for pasting into OpenSSH ..." and paste it into the box at [https://ccdb.computecanada.ca/ssh_authorized_keys CCDB -> Manage SSH Keys]. For more about this, see [[SSH_Keys#Using_CCDB| SSH Keys: Using CCDB]]. | ||
==Installing | ==Installing locally== <!--T:16--> | ||
<!--T:11--> | <!--T:11--> | ||
| Line 39: | Line 39: | ||
<!--T:13--> | <!--T:13--> | ||
# Copy the contents of the box titled "Public key for pasting into OpenSSH ..." and paste it as a single line at the end of <code>/home/USERNAME/.ssh/authorized_keys</code> on the cluster you wish to connect to. | # Copy the contents of the box titled "Public key for pasting into OpenSSH ..." and paste it as a single line at the end of <code>/home/USERNAME/.ssh/authorized_keys</code> on the cluster you wish to connect to. | ||
# Ensure the permissions and ownership of the <code>~/.ssh</code> directory and files therein are correct, as described in | # Ensure the permissions and ownership of the <code>~/.ssh</code> directory and files therein are correct, as described in [[Using SSH keys in Linux#Installing_locally|these instructions]]. | ||
<!--T:17--> | <!--T:17--> | ||
| Line 48: | Line 48: | ||
<!--T:12--> | <!--T:12--> | ||
Test the new key by connecting to the server using SSH. | Test the new key by connecting to the server using SSH. | ||
See [[Connecting with PuTTY#Using a Key Pair| connecting with PuTTY using a key pair]] or [[Connecting with MobaXTerm#Using a Key Pair| connecting with MobaXTerm using a key pair]] | See [[Connecting with PuTTY#Using a Key Pair| connecting with PuTTY using a key pair]] or [[Connecting with MobaXTerm#Using a Key Pair| connecting with MobaXTerm using a key pair]]. | ||
<!--T:4--> | <!--T:4--> | ||
Revision as of 19:29, 12 November 2021
Parent page: SSH
Generating a key pair[edit]
The process of generating a key is nearly the same whether you are using PuTTY or MobaXTerm.
- With MobaXTerm, go to the menu item Tools->MobaKeyGen (SSH key generator)
- With PuTTY, run the PuTTYGen executable.
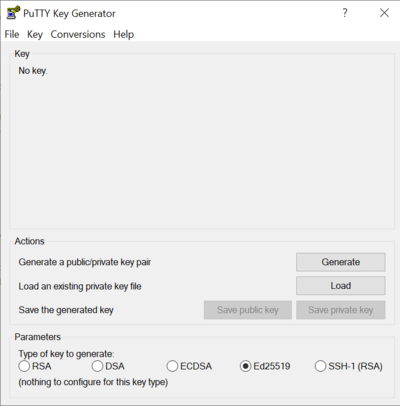
Both of these methods will cause a window to be displayed which can be used to generate a new key or to load an existing key. The PuTTY window is illustrated at right. The MobaXTerm window looks almost exactly the same.
- For "Type of key to generate" select "Ed25519". (Type "RSA" is also acceptable, but set the "Number of bits" to 2048 or greater.)
- Click the "Generate" button. You will then be asked to move your mouse around to generate random data to be used to create the key.
- Enter a passphrase for your key. Remember this passphrase, you will need it every time you reload PuTTY or MobaXTerm to use this key pair.
- Click "Save private key" and choose a meaningful file name (e.g. compute_canada.ppk).
- Click "Save public key". It is conventional to save the public key with the same name as the private key, but with a ".pub" file extension instead of ".ppk".
Installing the public part of the key pair[edit]
Installing via CCDB[edit]
We encourage you to register your SSH public key with the CCDB. This will let you to use it to log in to any Compute Canada HPC cluster. Copy the contents of the box titled "Public key for pasting into OpenSSH ..." and paste it into the box at CCDB -> Manage SSH Keys. For more about this, see SSH Keys: Using CCDB.
Installing locally[edit]
If for some reason you do not want to use the CCDB method, you may upload your public key onto each cluster as follows:
- Copy the contents of the box titled "Public key for pasting into OpenSSH ..." and paste it as a single line at the end of
/home/USERNAME/.ssh/authorized_keyson the cluster you wish to connect to. - Ensure the permissions and ownership of the
~/.sshdirectory and files therein are correct, as described in these instructions.
You may also use ssh-copy-id for this purpose, if it is available on your personal computer.
Connecting using a key pair[edit]
Test the new key by connecting to the server using SSH. See connecting with PuTTY using a key pair or connecting with MobaXTerm using a key pair.
Key generation and usage with PuTTY is demonstrated in this video : Easily setup PuTTY SSH keys for passwordless logins using Pageant.
Converting an OpenStack key[edit]
When a key is created on OpenStack you obtain a key with a ".pem" extension. This key can be converted to a format used by PuTTY by clicking the "Load" button in PuTTYGen. Then select the "All Files (*.*)" filter, select the ".pem" file you downloaded from OpenStack, and click "Open". You should also add a "Key passphrase" at this point to use when accessing your private key and then click "Save private key".
This private key can be used with PuTTY to connect to a VM created with OpenStack. For more about this, see "Launching a VM" on the Cloud Quick Start page.

